Pages

Wednesday, 27 February 2013

Devonshire Splits, Bath Buns and Fruit Buns. With One Dough!

Another pastry class and a week closer to another crazy assessment!
Next week I'm making a flavoured loaf which was featured in a past blog post
However this week I've been making a plain sweet dough. Which sounds a little boring, but the whole class made a variety of different buns. 

In the class we made Devonshire Splits. When I think of Devon, I think of my friends Leanne and Ben and secondly of traditional cream tea. Now, no matter which country in the world tries. The BEST cream tea is from the UK!
Image from: http://en.wikipedia.org/wiki/File:Devonshire_tea.jpg
Traditionally clotted cream, jam are served with scones and hot tea. However Devonshire Splits aka Cornwall Splits, (there isn't a difference in the bun, but the name varies on if you put the jam or cream on first) can also be served with instead of scones.  Just would like to point out that we also made some Devonshire Splits with fondant icing on top, which look very similar to éclairs

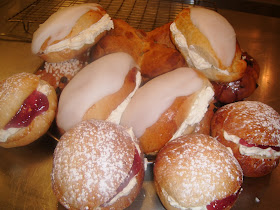
Devonshire Splits made by me in pastry class
Bath buns are sweet dough buns which can be filled with fruits such as raisins and can be served with jam or cream or even both! They are always topped with crushed sugar. 
Bath buns(far left) with different shaped Devonshire Splits.(Made by me) 
Recipe: Basic Bun Dough 
·       600g Strong Flour
·       15g Milk powder
·       75g Sugar
·       7g Salt
·       60g Unsalted butter
·       30g Liquid egg
·       37g Yeast
·       300g Warm Water

Devonshire Splits with icing:
·       500g Fondant Icing
·       Whipped Cream

Devonshire Splits:
·       Whole Egg for glazing
·       Whipped Cream
·       Raspberry Jam

Bath Buns
·       Whole Egg for glazing
·       Crushed sugar 
        
Fruit Buns
· 75g Sultanas

Equipment
·       Sieve
·       Bowl
·       Jug
·       Large baking sheet covered with silicone paper
·       2x Piping bags, one fitted with a star nozzle
·       Spoons
·       Pastry brush for the egg glaze
·       Whisk for the whipping cream

1.    Sieve the flour into a bowl, add the milk powder. Rub the butter into the flour until mix resembles breadcrumbs. Mix in the salt and sugar.
2.    Disperse yeast in some but not all of the water.
3.    Make a well in the flour mix, add the yeast water and also the egg. Add most of the yeasty water but not all. Knead the dough until the dough loses it’s stickiness. Add the rest of the water if the dough feels dry. 
4.    Cut into thirds. Mix 75g sultanas into one third of the dough, cut into 4’s and shape into round buns.
5.    Cut the two doughs into 4’s and shape four into oblongs and four into round buns.
6.    Place all the buns on the large tray covered with silicone paper and leave to proof for 30-45 minutes.
7.    Glaze the tops of the buns with a little egg wash and top the fruit buns with a little nibbed sugar.
8.    Bake at 180c/350f/Gas Mark 4/  for 15-20 minutes.
9. Place on a wire rack to cool.
10. Cut the plain buns slightly diagonally fill with cream and jam.
11. Cut the oblong buns across and top with melted fondant and fill with cream. Serve with tea!


Bake On!
Penny 

Sunday, 24 February 2013

A Cake in a Shape of a Burger?!

As mentioned in a blog post, (that was a while ago now), I have taken up a challenge in making my boyfriends 21st birthday cake. I know it's a month late but at least I managed to get it posted!
And yes it was a challenge and theres tons of buttercream involved!

I decided on a burger cake, not only to test my decorating skills but to celebrate my boyfriends birthday and celebrate our silly coupley in joke.
My boyfriend is a huge fan of comedy and adores the comedy style of Lee Evans. We both love his style of comedy and we have a little in joke of just saying:
"Burger"
So I made cake in the shape of a burger! Pretty simple really!
The original recipe and the tutorial was originally published by My Cake Decorating Magazine 


Recipe: Basic Chocolate Cake
  •        4 Eggs
  •        225g  diced unsalted butter, room temperature
  •        225g  cup of caster sugar
  •        175 self raising flour
  •        1 teaspoon baking powder
  •        50g  cocoa powder

Equipment:
  •        Sieve
  •        Bowlx2
  •        Mixer
  •        Measuring jug
  •        Scraper
  •        Cake tins 20cm/8inch x3
  •        Angled palette knife
  •        jug


1.    Preheat oven to 180c/350c/Gas Mark 4. Line and grease cake tins.
2.    Sieve together the flour, cocoa powder and baking powder in a bowl.
3.    Beat the butter, and sugar until light and fluffy using a mixer. Stop occasionally to scrape down the bowl.
4.    Crack all the eggs into a jug.
5.    Add the eggs a little at a time with the mixer on a higher speed. (if the mixture splits add a little bit of flour)
6.    Fold in half flour using a wooden spoon.
7.    Fold in the rest of the flour and fold in well.
8.    Divide the mixture between the two tins and smooth it down with an angled palette knife.
9.    Bake for 15 to 25 minutes.

Recipe: Decorating Materials 
  •        200g buttercream
  •        300g/1 pack of pale yellow sugar paste
  •        150g/1 pack of brown sugar paste
  •        20g/ 1 pack yellow sugar paste
  •        25g /1 pack green sugar paste
  •        15g/1 pack of red sugar paste
  •        Chocolate brown blossom tint
  •        Deep yellow blossom tint


Equipment:
  •        Cake carving knife
  •        Non stick cake board
  •        No stick rolling pin
  •        Cake smoother
  •        Fluting and veining tool or a toothpick
  •        Kitchen paper towels
  •        Flat paintbrush
  •        5/6cm round cutter
  •        Small knife

     1.Once your cakes have cooled. Place them in the freezer to make them easier to carve. I left it overnight but you can leave it for about 2 hours.
    2. Using a cake carving night, trim around the top and bottom edge of the cakes to create a smooth rounded shape. Once edge of two of the cakes should be more rounded than the other, so that they look like a bun.
    3. Carve the third cake so that it’s rounded on both edges. Once trimmed, cover each cake with buttercream to crumb-coat and put in the fridge for an hour.

   4. Roll out the pale sugarpaste to about 2-3mm thick and place it over one of the bun cakes. Use hands to smooth it over the top of the cake down and around the curved sides and tuck it under the bun. Tuck it in as neatly as you can. Smooth over the cake with the cake smoother, using a circular polishing motion. Do the same with the other cakes. Cover the second cake with pale yellow sugar paste and the third more rounded cake with brown sugar paste.

   5. Using a fluting and veining tool or a toothpick, make tiny little holes in the burger cake, press it into the side of burger to make pitted details in varying shapes and sizes. Make it look as random as possible.
   6. Tip a little chocolate brown blossom tint onto a kitchen paper towel and dip in a clean flat paintbrush. Sweep it over the sides of the burger to make it look more ‘greasy’.

   7. Tip a little bit of the deep yellow blossom tint onto another kitchen paper towel, tint the sides and top of the ‘top bun’ cake. Brush around the edge of the ‘bottom bun’ cake as well.
   8. Spoon a little buttercream onto the top of the ‘bottom bun’ (This is the unfinished side and should be facing upwards) and spread it out. Place the brown burger on top. The buttercream should glue it in place.
   9. Roll out the yellow sugar paste as thin as you can, about 1mm thick. Cut out a square using a cake smoother to get a straight edge. Roll out the paste again and roll out 3 more squares.
  10. Smear more buttercream on top of the burger and place the yellow squares on top of the burger, so that corner of it drapes over the edge to look like cheese slice.
  11. Roll out green flower paste as thinly as you can (it should ideally be a bit thinner than the cheese and larger diameter). Cut around the edge to make a wavy line and neaten it up. Dab a little more buttercream onto the cheese slices and place the green paste on top of the cheese. Pinch the top to create folds and make it look like green lettuce. Make 2 more lettuce leaves using the same technique.

  12. Roll out the red sugarpaste to 2mm thick and use a round cutter to cut 4/5 circles. Attach each one to the top of the lettuce with a smear of buttercream. Position them near the outer edge of the cake so that they can be seen. 
   13. Now put a decent layer of buttercream onto the tomatoes and lettuce, then carefully stick the top layer of your burger bun onto the cake.
   I've got to admit that I'm very proud of this cake! I took a ridiculous amount of photos and even decorated the cake long into the night. 

   That's why I'm in a dressing gown and looking very tired. Not the best picture ever. 
   I used white chocolate letters to spell out 'Happy 21st Birthday Rob', which I stuck on with some more, you guessed it, buttercream!
   
   This cake is not for one person. Don't be greedy with it Grandad. It must be a generational thing.  
    
    My boyfriend and his house mates loved it so much the cake didn't late long. It was eaten so quickly I didn't get the chance to take a single picture!!


   Bake On!
   Penny x


Wednesday, 13 February 2013

Limoncello Valentine Creams and Valentine Heart Shaped Biscuits

Valentines day is only one day away. I finally managed to make both  Limoncello truffles and Valentine Heart Biscuits. I didn't think that I would be able to make anything this year as I've been busy with work and home life etc etc. 

But I managed so woo!

Limoncello is a lemon based liquor originating in Italy. It's a really nice drink with lemonade in summer or neat but I don't recommend it! I know a certain friend, that can't stand the smell of limoncello because she got drunk and I wont name name's. Right Sof? Haha. 

You will need about 3 days to make these but that's because the truffles go into freezer twice. 
Day 1: Make truffle centre, pop in freezer
Day 2: Roll into balls. Back in freezer.
Day 3: Cover in chocolate and place in fridge to set. 

Before you go steaming in with this recipe, there's a little warning. Work with the truffle filling as quick as you can, as it's prone to melt at room temperature and at hand temperature. I wrapped some in little bags to give out as gifts, which were tied with floss, because I couldn't find any string. 


Recipe: Makes 36  

      ·   200g/7oz white chocolate
      ·   4 tbs double cream
      ·   Grated zest of 1 lemon
      ·   4 tbsp limoncello liqueur
      ·   100g/4oz butter
      ·   600g/22oz white chocolate, for tempering
      ·   Sprinkles/glitter
      ·   Pink food colour paste (optional)

Equipment:
     ·   Heatproof Bowl
     ·   Saucepan
     ·  Wooden Spoon
     ·  Whisk
     ·  Sealable container
     ·  Tablespoon
     ·  Teaspoon
     ·  2x Boards or plates covered with parchment paper
     ·  Fork 

    1.    Heat 5cm/2 inch water in a saucepan. Put a heatproof bowl on top of the pan, making sure the bottom of bowl does not touch the water. Place the 200g of chocolate in the bowl with the cream and heat gently to allow the chocolate to melt. If using put the food colouring into the mix at this stage.

    2.    Take the bowl off the heat and toss in the lemon zest, limoncello and butter. Whisk until the mixture looks like lemon curd.
   3.  Spoon into a sealable container, put the lid on and chill in the fridge overnight.

    Now go read a book or have a nap or just go about your business.

    4.    Scoop small teaspoons of the mixture and roll into balls. Put on a board lined with baking parchment and freeze overnight.
   
   Once again go outside and play in the snow (It's been snowing here in London again but now it's all slush by now.)
  
  5.   Temper the 600g chocolate by chopping it into pieces, then place it into a microwavable bowl and melt at 800-1000W, checking it 15 seconds and taking care that it doesn’t overheat. When the chocolate looks nearly melted but there are still a few bits bobbed on top, take it out of the microwave and stir in the chocolate gently until smooth.

    
   Look at the intense concentration on my face as I coat each truffle. I don't do photo's that well and it was on my bad side, of course. 
   6. Using a fork and spoon dip each truffle into the chocolate. Toss about to coat then lift out and place back onto the parchment paper, roughing the chocolate with a fork for a textured effect. Decorate while still wet. Repeat with all the truffles.
    7.    Place them in the fridge to set.
    8. Eat or wrap in bags to give away.


These biscuits are easy to make and make great gifts for that special someone. They will need a few hours to completely dry. I recommend that you make them a couple of days ahead of when you need them. 


Recipe: Makes 20 biscuits
    · 125g unsalted butter
    · 125g caster sugar
    · 1 medium egg
    · 1 tsp vanilla extract
    · 250g plain flour, sieved plus a little extra to flour your work surface.

Equipment:
   · Electric whisk
   ·      Bowl
   ·      Sieve
   ·      Heart shaped cutter
   ·      Whisk
   ·      Cling-film
   ·      Baking sheet lined with parchment
   ·      Rolling pin
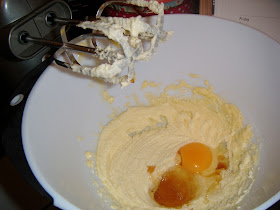
   1.    In a bowl, beat the butter and sugar together until light and creamy.
   2.    Add the egg and vanilla extract and mix together.
   3.    Sift half the flour into the bowl and mix in, then sift in the other half and mix again.
   4.    Knead the dough until smooth, then wrap in cling-film and let it rest in the fridge for 30 minutes.
   5.    Pre-heat your oven to 180c/350f/Gas Mark 4.
   6.    Roll out the dough on a lightly floured surface to around 4mm thick and cut out into heart shapes.
   7.    Place on a baking sheet lined with baking parchment and bake for 10-15 minutes until lightly golden brown. Allow to cool before decorating.

Recipe: Stiff peak royal icing
    · 500g icing sugar/confectioners’ sugar
    · 2 medium egg whites
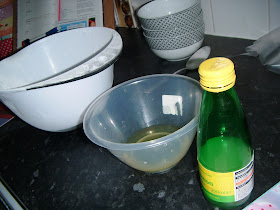
    · 1 tsp lemon juice
    · Red and pink food colouring paste
Equipment:
    ·  Electric whisk
    · Bowl x 4
    ·  Sieve
    · 6 disposable piping bags
    · Scissors
    · Forks x 3
    · Toothpick
    · Tissue
    · Tablespoons x 3

1.    Sift the icing sugar into a bowl.
2.    Add the egg whites and the lemon juice to the icing sugar and mix together for about 5 minutes.
3.    The mix should look smooth and shiny. If it looks a little dry then add one drop of lemon juice and mix for a minute.
4.    Once your icing makes a stiff peak put it in 3 clean bowls.
5.    Colour 2 of the bowls of icing red and pink. Leave one of the icing bowls coloured white.
6.    Quarter fill, 3 of the piping bags with each colour. Snip a small hole in the top of each bag.
7.    Take a heart biscuit and starting from the top centre, pipe an outline around the inside edge of the biscuit to the tip of the heart. Stop and move the bag away from the biscuit quickly. Then repeat on the other side. You can do this in a combination of colours including half and half colours.

8.    Make sure there are no holes or missing gaps in the hearts, if there are fill them in with the correct colour.
9.    Once all the hearts have been outlined, add a teaspoon of water to each of the colours until the consistency of each icing is runny. Keep adding water, carefully, until it reaches running consistency.
10.  Fill each 3 more disposable piping bags and cut 3 small holes in the ends.
11.  Flood the inside of the biscuit starting at the edge and zigzagging up and down until completely flooded.
12.  Working as quick as you can, decorate your biscuit with other colours, by holding the tip of the bag just above the iced biscuit using a gentle pressure.


  13.  If you pipe 2 lines of icing on your biscuit and then using a toothpick drag lightly through the icing to create a marbled pattern. Wipe the toothpick with tissue to clean. You can even put dots instead of lines to make mini hearts.
I hope you all have a lovely Valentines day! Happy Baking!
Bake and Love On!
Penny