Showing posts with label pastry cream. Show all posts

Friday, 3 April 2015

Fat Friday #36 Danish Pastry


So last week I had a synoptic test in which I had to prepare Florentines, Croissants, Sacher tort, Baked Alaska and classic Danish. I did very well I not only passed but I also got a... so happiness all round! It was my last pastry test but I have one more assignment left which is a centrepiece display but more on that soon. Lets get back to my favourite day of the week, its Fat Friday. This week is Danish pastry, its very similar to last weeks croissant dough, but more buttery. Again the suggestion is to weigh everything in pounds and ounces because its foolproof to make, if you weigh it this way.
 
Recipe makes about 12 small Danish (Kindly provided by my pastry tutor):
  • 1 lb Strong Flour / (680.39g)
  • 1oz butter/(113.40g)
  • 10oz butter
  • 1oz milk powder/(28.35g)
  • 1 egg
  • 1 oz sugar/(680.39g)- Extra sugar
  • Pinch of salt
  • 1 oz yeast/(680.39g)
  • 1 batch of Crème patisserie
  • Ground cinnamon
  • Raisins that have been soaked in boiling water (so that they are plump, best to do this about 2 hours before)

Equipment:
  • Sieve
  • Saucepan
  • Bowl x 2
  • Clingfilm
  • Rolling Pin
  • Knife
  • Pastry brush
  • Baking sheet lined with silicone paper
  • Palette knife

Method:
1.Sieve the flour, salt and milk powder.
2.Add 1 oz butter and rub into the dry mixture.
3.Warm the milk in a saucepan until body temperature. Add the yeast and sugar. Add the egg to form the dough.
4.Place in a clean bowl, cover with cling film and rest in the fridge for 10 minutes.
5.Roll out the dough vertically and place the larger amount of butter in the middle. Fold the dough into thirds to cover the butter. Roll out and perform 2 single turn. Place in the fridge for 20 minutes.
6.Repeat 2 more single turns.
7.Roll out the dough to about 2 ½ mm thick. Spread the crème pastisserie with a palette knife, then sprinkle the raisins and cinnamon sugar but leave about an inch.
8.Start rolling the dough up, egg wash the inch and seal firmly.
9.Place in the freezer for about 30 minutes, to make it easier to cut.
10.Cut into 1 inch circles and place into a tray and leave to prove until doubled in size.
11. Bake in the oven to 200c/400f/Gas Mark 6 until golden brown.
Have an excellent weekend
Bake On! Penny x

Friday, 26 September 2014

Fat Friday #9 Traditional Souffle

 
Welcome to the start of the weekend, but before that its that time of the week! NO, NOT BATH DAY! Its Fat Friday! This week we're looking at a traditional pastry cream soufflé. I've been practicing this with my pastry class. The recipe below features a spiced crumb which is worth making a couple of days before as it can be a lot for one day. This makes a good airy dessert, and also fairly impressive sounding at dinner parties. Mind you, you still wont get 10/10 on Come Dine with Me, because you forgot to match the wine....


Recipe: Makes 4 souffles (Recipe provided by my tutor)

Pain D’Epices (French Spiced Bread):

·       125g Strong flour
·       125g Plain flour
·       20g Baking powder
·       50g sugar
·       1 teaspoon cinnamon
·       1 teaspoon nutmeg
·       1 teaspoon star anise
·       30g candied peel
·       Seeds from one Vanilla pod
·       Grated orange zest
·       Grated lemon zest
·       250g warm honey
·       125ml whole milk
·       165g (about 3) eggs

Pastry Cream/Crème Patisserie
  • 40g sugar
  • 4 egg yolks
  • 25g soft flour
  • 30g corn flour
  • 300ml milk
  • 1 vanilla pod, split

Souffle:
  • 4 egg whites
  • 40g sugar

Equipment:
  • Bowl
  • Whisk/hand-held electric whisk
  • Chopping Board
  • Saucepan
  • Knife
  • Wooden Spoon
  • Measuring Jug
  • Teaspoon
  • Tablespoon
  • Timer
  • 4 Ramekins
  • Baking sheet covered with a damp tea towel
  • Cling Film
  • Piping bag
  • Scissors
  • Blender
  • Loaf tin lined with silicone paper
Pain D’Epices Bread

1.    Preheat the oven Gas Mark 2/ 300f/150f .

2.    Place all the dry ingredients in a bowl, along with the zests, peel and vanilla seeds. Mix briefly.
3.    Add the wet ingredients and mix until combined. Place in the prepared loaf tin and bake for 40 minutes or until golden.
4.    Leave to dry for at least 24 hours or until very dry.
5.    In a blender, blend until fine breadcrumbs.
 
For the Pastry Cream
 
 
1.    Pour the milk in a saucepan. Add the vanilla seeds and the pod, bring the milk to the boil.  2.    Beat the sugar and egg until a pale yellow, thick and cream. Whisk in the flour and cornflour.
3.    Remove the vanilla bean from the milk, and stir ½ of the milk into the egg yolk mixture and whisk well to combine.

4.    Return the all of the mixture to a saucepan on a low heat and whisk continuously until the pastry cream is thick and yellow.

5.    Place the pastry cream in a clean bowl and cover the surface with cling film. Put aside to cool and refrigerate until needed.

Preparation for the Ramekins:
1.    Chill ramekins in the fridge for as long as possible.
2.    Melt a little butter in a saucepan.
3.    Meanwhile get a tray lined with a damp teatowel ready.
4.    Using a pastry brush, brush the bottom of the ramekin and the sides using vertical strokes. Chill the ramekins in the fridge.
5.    Line the ramekins with the pain d’epices crumbs and place in the fridge until needed.

To Complete the Souffle:
1.    Whisk 400g of egg white with 20g of sugar. Continue to whisk and gradually add the remaining sugar until the egg whites are very fluffy.
2.    In a clean bowl, whisk the pastry cream to loosen.
3.    Mix the egg whites with the pastry cream until combined.
4.    Divide the mixture into the prepared ramekins using a piping bag, level with a palette knife, then pinch the sides to create an even soufflé bake.

5.    Bake at Gas Mark 4/350c/180c for 16 minutes, turning carefully once after 6 minutes they should be golden and very fluffy.

Have you tried a soufflé before? Have a great weekend and Happy Baking!


Bake On! Penny x

Friday, 26 October 2012

Fun Things to do with Puff Pastry


My previous post was how to make puff pastry from scratch. This post is about the fun things you can make from puff pastry including Bande aux Fruite, Cream Horns, Eccles Cakes, and Palmiers

A Bande aux Fruite is an rectangle shaped fruit tart that is filled with pastry cream originating in France. 

Recipe: Bande aux Fruite
  • Puff pastry
  • Pastry cream (click here for recipe)
  • Fresh fruit of your choice (I used kiwi, strawberry and peach)
  • Apricot jam to glaze


Equipment:
  • Rolling pin
  • Knife
  • Non-stick board
  • Piping bag
  • Baking sheet with silicone paper


  1. Roll out the puff pastry to rectangle shape. Trim the sides so its straight edges.
  2. The side strips should be about 1 1/2cm thick.
  3. Dab water down the sides and lay strips on the long sides of the rectangles. Make a pattern on the strips if needed.
  4. Brush with egg wash and rest for 30 minutes.
  5. Prick the middle of the puff pastry to let the steam out. Cook at 215c/Gas Mark 7/ 425f for 15 mins.
  6. Once taken out of the oven and cooled. Put the pastry cream into a piping bag and pipe onto the middle of puff pastry.
  7. Cut desired fruit and place in lines to decorate.
  8. Heat up an apricot glaze to finish the fruit.


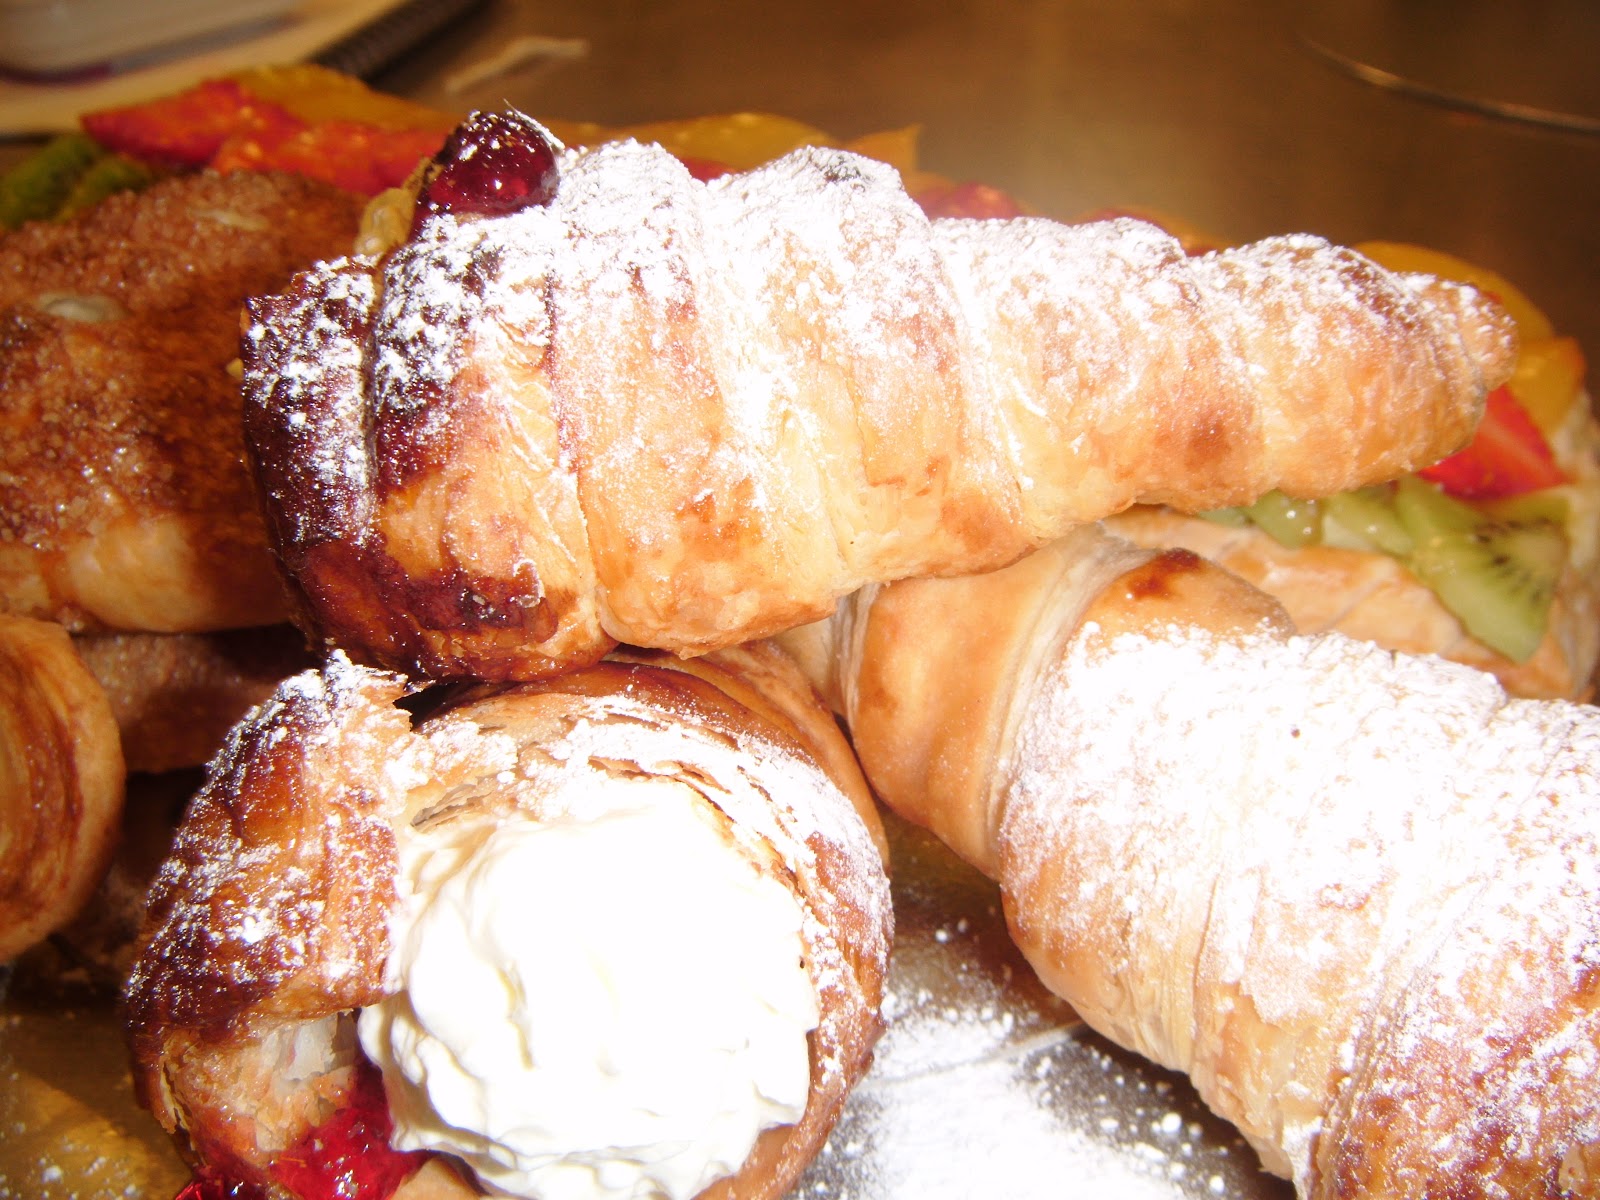
Cream horns are strips of puff pastry rolled around a horned mold (no jokes please) baked and filled with cream chantilly (icing sugar and whipped cream).

Recipe: Cream Horns
  • 200g puff pastry    
  • 100g jam
  • Cream Chantilly
  • Egg white
  • Caster sugar
  • Softened butter
  • Flour to dust


Equipment:
  • Rolling pin
  • Non stick board
  • Pastry brush
  • Knife
  • Cream Horn molds
  • Star nozzles
  • 2 piping bags
  • Baking sheet with silicone paper


  1.  Brush softened butter over the cream horn molds and flour them well.
  2. Roll out the puff pastry to 2mm thick very long rectangle.
  3. Trim off edges that measure 1 ½ cm wide.
  4. Start wrapping the pastry strip around the pointed end of the cream horn mold. Make sure the pastry overlaps slightly.
  5. Seal the end of pastry with egg white and dip the round horn end into caster sugar.
  6. Bake 220c/Gas Mark 7/ 425f for 20 minutes.
  7. Once cooled pipe a line of jam on flat end cream horn.
  8. Pipe in a swirl of cream.
  9. Dust the cream horns with icing sugar.


The eccles cake, rather puff pastry not really a cake, is named after the town in North England, and has been around since 1793. Some rather interesting nicknames for this 'cake' is fly cake, flies graveyard and squashed fly cake! This may be for the currents squashed into the cake. 

Recipe: Eccles Cakes
  • 250g Puff pastry
  • 100g Brown Sugar
  • 30g butter
  • 120g currents
  • A pinch of mixed spice
  • Egg white


Equipment:
  • Rolling pin
  • 2 Circle cutters
  • Baking sheet with silicone paper


  1. Roll out the pastry approximately 1.5mm thick.
  2. Cut out with a round, 4 inch cutter.
  3. Place a tablespoon of filling in the centre of each piece.
  4. Fold the edges into the centre, sealing in the filling and then turn over.
  5. Either flatten with the palm of the hand.
  6. Wash the tops with egg white or water and dip into caster sugar.
  7. Make 3 slits on the top with aknife so the filling shows through.
  8. Allow 30 minutes resting time.
  9. Bake at 215c/Gas Mark 7/420f for 10 minutes
  10. Check after 10 minutes.


Recipe: Palmiers
The palmier, meaning palm tree, has very mysterious origins but has earned the nickname 'elephant ears' due to the shape. They can be made with cinnamon or dipped in chocolate or made with savoury ingredients. 

  • 250g Puff pastry
  • 100g Caster Sugar
  • A pinch of cinnamon
  • Water


Equipment:
  • Rolling pin
  • Baking sheet with silicone paper
  • Small bowl


  1. In a small bowl, mix together sugar and cinnamon.
  2. Sprinkle ¼ cup of sugar on a clean work surface.
  3. Gently unfold one of the pastry sheets. Place the pastry sheet on top of the sugared work surface.
  4. Sprinkle the top side evenly with water and ½ of the sugar to within ½ inch of the edges. Gently press the sugar into the pastry.
  5. Using  rolling pin, gently roll out the dough into a 9 x 15 inch rectangle.
  6. Using your fingers, roll the dough length-wise into a long cylinder, as tightly as possible without stretching it. Stop when you reach the middle. Do this for both sides.
  7. Wrap tightly in plastic wrap and place in the fridge for 30 minutes.
  8. Using a sharp knife cut the dough crosswise so that you have little thin ‘scroll’ slices.
  9. Cover with plastic wrap and place in the fridge for an 1 hour.
  10. Preheat oven to 220c/Gas Mark 7/425f and bake for 5 minutes.
  11. After 5 minutes reduce the oven to 200c/Gas Mark 6/400f and bake for another 10 minutes.
  12. Remove from the oven using a thin spatula transfer to a wire rack to cool. 

I hope you enjoyed this post about the wonders of puff pastry! 

Bake On!
Penny

Bake On! Penny x

Thursday, 11 October 2012

My First Pastry Class: Dutch Apple Pie and Fruit Tartlets/Barquettes

I went to my first ever pastry class and I have a brand new lesson to add to the The Rules of Baking: Dont Panic!!! Let me explain the situation. 
15 people wanting to weigh up the ingredients between 4 sets of scales. So I did weigh out my ingredients out incorrectly, but luckily this was corrected swiftly. 
It was chaotic. As you can imagine but we all managed. 
Also, since we were all so keen to see how all our pastry was doing, the oven kept getting opened and closed. This lead to a couple of peoples pastries being uncooked, including my barquettes and tartlets. 
Once again in The Rules of Baking, no matter how badly you want to open that oven DON'T!! You let out the heat and can make cake's sink or make pastry under cook. 
Lesson 1 was concerned with basic sweet pastry, apple filling and french pastry cream. 

(Please note that next time I'm going to take loads of pictures but didn't get the chance too as it was an unfamiliar kitchen)
My Dutch Apple Pie and Fresh Fruit barquettes and tartlets

A traditional Dutch Apple Pie (Appeltaart) is often decorated with a lattice and flavoured with cinnamon and lemon juice. This is the recipe that I have used. You can serve it with ice cream , custard or cream. However in the U.S.A, a Dutch Apple is served with a streusel topping.  
An example of a dutch apple pie picture from Food Gawker:
http://foodgawker.com/post/2010/03/14/54134/ 

A barquette is a small boat shaped pastry which can be filled with a variety of sweet or savoury ingredients. 

An example of a barquette picture from Auckland Catering website
 http://www.edencatering.co.nz/page.aspx?pageid=392
Pastry cream is a type of custard that comes from France and is also known as crème pâtissière. It  is a combination of milk or cream, sugar, egg yolks, a type of starch like flour and flavouring such as vanilla, lemon or chocolate. 

Recipe: Sweet Pastry 
  • 240g flour (Plus extra for greasing)
  • 130g unsalted butter (Plus extra for greasing)
  • 60g caster sugar
  • 50g egg/1 egg 
  • A few drops of vanilla essence
  • Lemon zestA pinch of salt 
  • (plus the fruit for the tarts/barquettes such as strawberries and kiwi's)

Equipment: 
  • Mixing bowl  
  • Wooden spoon or Scraper  
  • Sieve
  • Metal 7 inch ring
  • 3 x Round models
  • 3 x Barquette models
  • Silicone paper
  • 2 x small baking trays
  • Knife

  1.     Cream the sugar and butter for a few minutes until light and fluffy.
  2.     Season with the lemon zest. Add the pinch of salt to add bite. 
  3.     Pour vanilla into the cap and add a few drops to the mixture.
  4.     Sieve the flour into the bowl and cut the butter into the flour mixture.
  5.     Work the butter into the mix using your hands until it looks like breadcrumbs.
  6.     Add the egg and bring the mixture together. The amount of eggs will depend on how much moisture there is in the mixture. If you need to add more egg, break one into a little bowl and break down with a fork. 
  7.     The mixture should feel wet and sticky. Knead it into a ball using your hands.
  8.     The mix should be put in the fridge for at least 30 minutes. 
  9.     When the mixture has been chilled enough. Cut into 3 equal sections. 
  10.     Place silicone paper onto the baking trays and butter and flour the molds and 7 inch ring. Roll out 1/3 of the pastry to fit a 7 inch ring, around 3 mm thickness. Cover the metal ring and dent around the edges.
  11.     Add the apple filling to the pie base (see the recipe below) to the 7 inch case.
  12.     To make the lattice, roll out 3mm thickness on a floured surface and measure the dough so it fits over the 7 inch case. 
  13.     Cut into 8, 1cm strips. To make it easier to move place on baking parchment. 
  14.     Assemble the lattice and flip onto the flan. Cut the silicone paper into a circle and blind bake in the oven on 200-220c for about 40 minutes. 
  15.     Assemble the tarts/barquettes as above but fill with the pastry cream (see the recipe below) instead of the apple filling. Decorate with fresh fruit.
My barquettes and tartlets filled with pastry cream and decorated with fresh kiwi, strawberry, plum and grapes.

Recipe: Apple filling

  • 400g cooking apples
  • 100g sugar
  • Pinch of cinnamon
  • 50g sultanas 
  • Lemon zest/juice
Equipment: 
  • Peeler/sharp knife
  • Waste bowl 
  • Pan
  • Wooden spoon
1.    Peel, core, wash and slice apples.
2.    Place into the sauce pan with the sugar.
3.    Partly cook the apples, add the cinnamon and lemon zest/juice
4.    Add the sultanas, mix and leave the apple mix to cool
My Dutch Apple Pie filled with the above recipe's apple filling.

Recipe: Pastry Cream (using French custard powder)
  • 500ml of milk
  • 75g sugar 
  • 48g French custard powder
  • 100g/2 eggs
  • 25g butter
Equipment: 
  • Peeler/sharp knife 
  • Waste bowl 
  • Pan
  • Wooden spoon
  1.     Heat the milk slightly but not so it’s boiling.
  2.     Whisk the egg, sugar, and custard powder.
  3.     Add a little milk to the custard mix a little at a time. 
  4.     Stir until thick.When thick, mix in the butter.  
  5.     Cover with cling film if needed.  
  6.     For the tarts/barquettes fill with custard and decorate with fresh fruit.
I hope you find this recipe as much fun as I did. 
Bake On!
Penny 
Bake On! Penny x
Related Posts Plugin for WordPress, Blogger...