Showing posts with label family. Show all posts

Thursday, 8 January 2015

What I got For Christmas 2014

I'm very lucky to have friends and family who know me very well. They know that getting food and baking related gifts is always a winner. I'm so grateful for all my gifts this year, and I thought I would share with you readers what I got. (Its also a thank-you post as well :))  
One of the coolest notebooks that I've ever received is the 'Notes of a Baking Genius'. Which sums me up perfectly! Which my friends Lucy and Ben got me. I'm also in love with my cute cupcake little diary which I'll be documenting my blog post dates and college deadlines (Thanks Nan and Gramps). The baking dvd and book combo my mum got, when I have a moment I'll have to watch it (Thanks Mum!) Also, the tea towels my Mum got me as well, which are very pretty.
 I got the Great British Bake Off Showstoppers (thankies Sofia!) which I've been browsing for my next bake. Also, I got the latest Primrose Bakery book which is all about Christmas cakes and bakes (again thank you Mum). I haven't had a chance to look at this one, but I'm looking forward to reading it. Another fantastic gift is the green tea-towel which has written on here: "1. Bake Cake, 2. Accidentally eat it all myself." Again, Lucy and Ben nailed it, thank you!

Another couple of lovely gifts I got were from 2 good friends of mine, unfortunately I was too stupid to take any pictures of them. I opened them up at different times before Christmas and, I tend to get a bit over excited, so I ripped them to shreds. Firstly, I received a pretty blue owl mug and Instant Chai Latte mix that I got from Chloe. I wish I had taken a picture of the whole thing wrapped up because it was so pretty. Many thankies Chloe! Also, my friend Zoe knows me very well in my love off all things coffee related and she got Starbucks Hot Chocolate Mixes *Homer Simpson Drool*. Thanks Zoe!! I'm also very lucky in getting my first ever blowtorch, which is a girly pink! I also got 2 adorable little heart shaped crème brulee pots with the blowtorch! Thanks Chantelle and Nicky, I can't wait to use this!

Lastly, Rob got me the coolest thing ever: a Rice Cube! (didn't take pictures was to busy being a child and opening them up). Its a cute little device that makes sushi simple. I can't wait to start playing with it. Rob also got me a traditional bamboo steamer, presumably to go with my Rice Cube. Thank you so much Rob!

The next gift has nothing to do with baking at all, but it definitely deserves a mention. Its a zombie desktop shooting set! I've got a pencil gun with rubber band shots and zombie rubber targets. I keep getting distracted cause they need to be shot at! (Lucy and Ben woo!! Thank you very very much for this!)
I did get more pressies but they were more skincare related and there are plenty of blogs that showcase beauty and make-up bits. This be a foodie blog and make-up is not really my domain anyway.

Did you get any food related gifts this Christmas?
Bake On! Penny x

Wednesday, 31 December 2014

Its Going to be the Best Year Yet! (Yeah erm that depends)

I'm sure most of you have noticed the many posts of new year resolutions and general Happy New Years floating around on the internet and in the real world, via friends and family. When blog posts, magazines or videos are titled "best year yet" or "Make this year great" it really winds me up. Although some are very inspirational and well written, my problem with these type of articles is that they assume that there is something wrong with all of us. You are perfect. These articles give you tips and tricks to sticking with your resolutions and changing your life, but the truth is that you are the only one who can make these changes and no amount of life hacks can help with that. You can read until your eyes pop out about the amount of new year life changes but its up to you. I believe greatly in setting your own goals for a new year but realistic ones. Did you know that 88% of new year resolutions fail in the UK? Rather then give you the traditional tips, I'm offering improved resolutions to consider in the new year to help you succeed. ive chosen three common resolutions

1. Old resolution: I want to lose weight/drop a dress size
This always comes up, every year. Maybe not for you, but for someone you know perhaps. January can be a cold and unforgiving month. Your body needs food during the harsh cold months, so starving yourself with that new diet will be much harder and more likely to fail. The best time to diet is around March and April, in time for the spring. Rather then dieting, make smarter choices for a healthier you. You fancy a chocolate bar, swap it for dark chocolate cover fruit (strawberries work well). Its the weekend approaching, you want to order a take-away, why not cook your own instead? You know whats in your food. You get the idea? Let me assure you, dear reader, you are perfect the way you are. Diets are the work of devils and often, end in tears and frustration and you are worth more then that.

Improved resolution: I will try to slowly start my healthly diet but making smarter food choices.

2.Old resolution: I will stop smoking/drinking
Drinking and smoking is very addictive. Much like dieting, it will be a slow process. Quiting smoking especially is the hardest thing in the world. Set a date to start cutting down and simply start. If you smoke 10 cigerettes a day, cut out one in 3 days and follow on from there. Do this with drink as well. Normally you may have a 3 glasses at the weekend, cut out the one and follow from there. This can be applied to most negetive habits. You can do it! Friends and family are there to support you at anytime, you only need to ask.

Improved resolution: I will gradually cut out smoking at my own pace.

3. Old resolution: I will not splurge on junk
Saving money is very tough. It can be hard when you like a good spend, a nice meal out or like a little shopping spree. Starting a money jar with loose change can help towards savings. You can even start a 'drink/smoke/swear' jar, wherein you put a little bit of money in jar whenever you drink/smoke/swear.Making your own lunch or drinks to-go can also save you money in the long run. by making small changes you can save that money and put it towards something great!

 Improved resolution: I will make my own lunches to save myself a little bit of money each week.

Whatever your resolution is, I fully believe That you can do it. If you need support then comment on the Facebook page! Goodbye 2014 and Hello 2015! Happy New Year!

Bake On! Penny x

Monday, 3 November 2014

Monday Catch-Up: Halloween is Over...Let Christmas Begin...

Its the weekend after Halloween and two weeks after my last Monday Catch-Up, and as most of you now if you've read it, I've been suffering with a bad back. Its been really holding me back from doing everyday stuff. So I've learnt that you really need to look after yourself or it just gets a million times worse. Don't make my mistake, just take care of yourself when you're poorly.

I've had a busy week, I've been baking quite a lot for Halloween including salted caramel browniespumpkin pecan bars, pizza chunks and chocolate cupcakes (all gluten free btw-Your welcome Zoe) with Sugar and Crumbs "sugar and spice" icing sugar, that I got from the Cake and Bake Show this year.

Rob and I had a little bit of a 'get together' at our flat, for Halloween and as a house warming, where the drinks flowed and tacky games were played, it was such a laugh and I think everyone had a good time. It was a moment to be enjoyed and we forgot to Instagram any of it. It is a good thing as it proves that we didn't need to document that moment in our lives because we were living it!

My mum also dropped by last weekend, in which we went shopping and had lunch :) which was lovely! I haven't seen her in 3 months and she was so excited to see me and Rob. 

I also had a side trip to Lush Poole, which I got a couple pre-Christmas gifts (for myself...).I'm also pleased to let you all know that I'm almost done with all my Christmas shopping. Its only the 3rd of November and I've got 3 more gifts to buy and I'm fully done! Woo! So when the shops are crammed in December, I'll be at home with my cup of herbal tea and a cookie all snugged up and smug because I did my Christmas shopping ridiculously early. Is it wrong that I've done my cards as well... that's not wrong... is it?

So now that Halloween is done... Bring on Christmas!

Bake On! Penny x

Wednesday, 30 October 2013

Happy Halloween 2013 Bakers

Reading all the lively and seasonal recipes and posts based on one of my favourite holidays. Thats halloween of course! Dios de los muertos is another favourite... and there's Christmas.... do birthdays count then?
Back to the subject at hand, sadly this year I havent had the chance to bake for Halloween. I know its bakery blasphemy but I've been bogged down with university work. Being the last year, its the toughest I've had to face. Super fun coursework includes:
*Business Research Product on female chefs
*Stragetic Management Report on Starbucks
*Stragetic Marketing Report on Tesco
* Working on the Slow Food society
So its pretty hectic at the moment. I have no outside life at the moment. But on the plus side I did do enough baking last year to make up for it. Heres the links for last years Halloween baking:
*Orange juice Cupcakes
* Day of the dead cupcakes
* Ginger Cupcakes with a Ginger frosting
So whats happening to the student who's not really that into boozing it up in her adult life and is too old for trick or treating (too many people asking where the kid is and I reply oh I guess that me. They give you a sad look), I'll be watching horror films back to back and scare myself stupid or go on a ghost walk. It depends on how cold it is outside!
Happy Halloween and... dont have nightmares....
Bake On!

Follow on Bloglovin
Bake On! Penny x

Wednesday, 29 May 2013

Pastry Class: Fruit Bavarois, Vanilla Pannacotta, Lemon Steamed Sponge Pudding and Easy Apple Crumble.

In this week's pastry class, we were continuing to look at hot and cold desserts. It was a mixed bag of recipes, all of which can easily be done with the intention of impressing your family and dinner guests. 

A bavarois is a type of mousse made with double or whipping cream. It can be made with chocolate, fruit or even vegetables. I wasn't surprised to see that Heston Blumental of the Fat Duck restaurant has already made a wacky version of a bavarois. If your new to a bavarois, stick to fruit such as strawberries or raspberries. I had to do this for a pastry assessment along with creme caramel, which was surprisingly easy, why not give it a go?

Fruit bavarois made by me with raspberry puree
Recipe: Fruit Bavarois
Ingredients:
·       125g fruit puree (I used raspberry)
·       125g stock syrup (recipe here just omit the cinnamon)
·       250g whipping cream
·       3 gelatine leaves
·       10g lemon juice

Equipment:
·       Whisk
·       Bowlx2
·       Saucepan
·       Spatula
·       1 bowl of ice
·       4 round cook rings lined with clear acetate
·       1 tray lined with silicone paper
·       1 disposable piping bag
Step 1. Line the tray 
1.    Line a tray with silicone paper and then line 4 small cook rings with clear plastic acetate. 
Steap 2. Soak the gelatine
2.    Soak the gelatine in a small with cold water. Make sure that it is cold water as if the water is warm the gelatine will dissolve and become useless.
3.    Whip the whipping cream until it just standing up, holding its peak.
4.    Mix together the syrup and fruit puree in a saucepan and heat gently on a low heat.
5.    Once the fruit and syrup has heated through, take off the heat and add the gelatine leaves. To do this, take the gelatine out of the water, (they should be squeezy and a little slimy) and squeezing until all of the water has been rung out.
6.    Stir the mixture until the gelatine has dissolved, this should take about a minute. At this point you can add the lemon juice according to taste. If you’d like a really sweet mousse then omit the lemon juice.
Step 7. Cool it down as quickly as possible
7.    To cool the mixture down as quickly as possible, have a bowl of ice ready. Put the fruit mixture into another bowl and place that into the bucket of ice and whisk lightly to cool down. Scrap the sides down once and a while so that the mix doesn’t set on the side of the bowl.
Step 8. fold in the cream
8. Once the mixture is cold enough then fold in the semi whipped cream in thirds.
Step 9. Pipe into the cook rings
9. Once all the cream has been incorporated, place the mixture into a piping bag and pipe into the cook rings.
10. Place in the fridge for about an 1 hour and 30 mins or until set.
Step 11. Remove from mould
11. To remove, place a palette knife under the bavarois and place on desired plate. Take the cook ring off and carefully peel the acetate off.
A finished bavarois made by my pastry tutor faye

My finished bavarois made by erm me!

12. Keep the decoration simple, pipe a little whipped cream and garnish with raspberry and mint, and maybe a little icing sugar if your feeling fancy!
Vanilla panna cotta to the right of this picture. 
Panna-cotta is an Italian cooked cream dessert that can be flavoured with chocolate, fruit or caramel. As long as you get the jiggly wiggly cream right its a sure-fire winner!

Vanilla Panna-Cotta
Ingredients:
·       125ml milk
·       375ml double cream
·       ½ vanilla pod
·       1 aniseed
·       2 gelatine leaves/ 2 agar agar leaves if you're a vegetarian 
·       50g caster sugar

Equipment:
·       Whisk
·       Bowlx2
·       Saucepan
·       Spatula
·       4 dario molds/ or the small Christmas pudding moulds/ ramakins
·       Measuring jug
·       Sieve

1.    Soak the gelatine in a small with cold water. Make sure that it is cold water as if the water is warm the gelatine will dissolve and become useless.

2.    Add the cream, milk, the vanilla pod and the aniseed into a saucepan and heat gently until boiling slightly.
3.    Once the mixture is hot enough add the sugar and gelatine.
4.    Take the mixture off the heat and stir until the sugar and the gelatine has dissolved.
5.    Sieve the mixture into a measuring jug. This removes the star anise.
6.    Let the panna-cotta mixture cool for a few moments before pouring into the Dario molds and placing into the fridge for about 1 hour or until set.
7.    The best way to get the pannacotta out of the mold onto a plate, is to have a bowl of warm water ready. Place the mold into the water for about 6 seconds, get your desired plate on top of the mold then flip the plate, so that is on a table. Wiggle the mold a little until it is evenly on the plate.
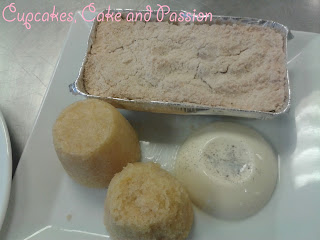
Steamed sponge pudding to the left

There is little to explain about this. It's lemon flavoured sponge slowly steam cooked, perfect with custard or ice cream.
Lemon Steamed Sponge Pudding
Ingredients:
·       270g plain flour, sieved
·       15g baking powder, sieved
·       250g caster sugar
·       250g margarine, room temperature
·       5 eggs
·       The juice and zest of 2 lemons

Equipment:
·       Wooden spoon
·       Grater
·       Bowlx2
·       Electric hand held whisk/Spatula
·       Sieve
·       Small Dario moulds or small metal moulds well greased with margarine and flour

1.    Preheat the oven to Gas ¼/ 225f/ 110c
2.    Sieve the flour and baking powder into a separate bowl and put aside.
3.    Cream the sugar and margarine together using a spatula/hand held electric whisk.
4.    Add the eggs one at a time, beating after each addition.
5.    Fold in the flour and baking powder gently until fully incorporated.
6.    Add the lemon zest and juice and fold in again.
7.    Spoon into the very well buttered and floured moulds.
8.    Bake for 30-45minutes at Gas ¼/ 225f/ 110c. This is a steamed pudding, so the oven needs to be at a lower temperature. You will know when the puddings are ready when you can put a knife into the cake and it comes out clean.
Apple crumble top of the picture.

An apple crumble is, as far as I'm aware, is a British dessert which is served in Autumn when apples are at there best.  This makes a great family dessert and is insanely easy to make!

Apple crumble
Ingredients:
·       300g plain flour, sieved
·       150g caster sugar, sieved
·       100g unsalted butter, room temperature
·       1 can tinned apples or 450g peeled, cored apples and cut into 1cm cubes
·       1 pinch of cinnamon  
·       Cream or custard to serve

Equipment:
·       Sieve
·       Bowl x 2
·       Oven proof dish
·       Colander

1.    Pre-heat the oven to 180c/350f/Gas Mark 4
2.    Drain all the syrup from the apples using a colander Or peel, core and dice the apples. Put the fresh apples in a bowl of water with a little lemon juice to stop them from going brown.
3.    Sieve the flour and sugar into a bowl with the butter, rub together until it resembles fine breadcrumbs.
4.    Place the apples into the oven proof dish and then a pinch of cinnamon on top of the apples.
5.    Sprinkle the crumble mix on top. Don’t be tempted to pack it down, this will solidify the crumble into a biscuit.
6.    Bake the crumble for 40-45 minutes, or until the top is brown.
7.    Serve with custard or thick cream

I hope you've enjoyed this weeks pastry class!
Bake on!

Bake On! Penny x

Wednesday, 13 March 2013

Mother's Day Decoration Class at Primrose Bakery


It would be completely wrong if I had a baking blog and not tell you about my visit to Primrose Bakery, in Covent Garden. I was lucky enough to go a Mother’s Day themed class to bring home some cupcakes as a gift for mum. (She’s cool about eating cupcakes, just not decorating them)

Primrose Bakery was first founded in 2004 by Martha Swift and Lisa Thomas who started baking from their own kitchen in North London, for children’s parties. They realised that cupcakes were perfect for every occasion and versatile. They soon started to sell their cakes to a local delicatessen and the business grew when they were approached by Selfridges Food Hall.  In 2006, the first bakery in Primrose Hill opened and history was made. Now with 2 shops (with another one on the way!) and 2 cookbooks  and my sources at the Primrose class, tell me that a new book is coming out roughly about October time, which features some of the very trendy cocktail cupcakes (can’t go wrong with a boozy cake.)

Now if I have to be honest, I felt slightly intimidated going into a cupcake class on my own. I was expecting that there would be mother and daughters together and that made me feel a little like the odd one out. However, once I stepped through the threshold that feeling was replaced by one of welcoming. The pastel hues and the smell of freshly baked cupcakes just lift’s the spirit and puts a smile on your face.
Primrose Bakery at Covent Garden 

I was quickly greeted by the lovely Laura, one of the bakers and helpful Becky, one of front of house staff. They asked me my name and gave me a name sticker and I was offered a drink. Diet coke, of course, and once all the class had arrived we were ready to begin.
Laura making vanilla butter cream. Ignore the little kid in the background. 
The start of the class began with Laura showing us how to make a basic vanilla buttercream. Now, I have loads of experience making buttercream, so to me I wanted to get right down to the decorating. But some of the girls I spoke too weren't familiar with making buttercream, so it was something new to them. What was new to me, was the signature Primrose swirl. Laura had demonstrated to the group and she made it look really easy. In practice, it’s very hard. It requires lots of practice and patience. The group I was sitting with all had such a laugh while trying making that swirl.
Laura showing us the Primrose Swirl.
Both Becky and Laura were ready to lend a hand to show us how to do that lovely swirl. There were cupcakes squashed in hands, melted buttercream on fingers (and into our mouths! The chocolate buttercream was to die for!) and even buttercream in the floor. It took me ages for a decent swirl but finally I got one! Woo! 

My first Primrose Swirl.
We were also given a decorating tool kit along with some various coloured buttercreams, floral decorations and sprinkles. 
Chocolate cupcakes decorated by me.
We then decorated mini cupcakes, which I found easier. However the opinions were mixed. The same thing happened with the chocolate buttercream, which I found easier to work with as it was easier to work with, but the girls on the table had mixed opinions.

Laura then showed us how to decorate a cupcake with a flat top so that it makes it easier to write on. Continuing along this line, we were shown how to make a paper piping bag, which I found very difficult to do up until now.  Laura showed us how to fill up our piping bags with buttercream, and pipe out messages on a large cake and on cupcakes. We were given a round sheet of baking parchment to practice writing on.
Oh gez what a mess!
Since it was a special mother’s day class, we were given a Violet flavoured cupcake to decorate. This was the cupcake I decided to write on. I think it turned out pretty well!
I love you Mum Violet Cupcake.

Just at the end of the class were shown how to ice a layer cake the Primrose way. Including making a flat surface, and textured cake.
A lush chocolate cake!
One thing that I regret is not decorating more cupcakes. I was in such a concentration mode that I only managed to decorate 5 cupcakes in total. I now know for next time, decorate more cakes!
But overall, I was very proud of the end results! My mum loved them so much she was upset about eating them.
The end results!
Regarding the class, what can I say? It was a pleasure to be there. The whole experience was homely, personal and fun to do. It was a really intimate class and I think that everyone enjoyed the class regardless of their decorating skills.
My goodie bag contents.
I almost forgot about the goodie bag! Our cupcakes got packed into boxes, along with a recipe card, postcard signed by Martha Swift and Lisa Thomas and a card for a free cupcake! So was it worth going? Definitely! Even if you just get dragged along with a cupcake fanatic, you'll enjoy the atmosphere. (I'm sure everyone knows a cupcake fanatic.)

Wondering if it's for you?
What to Expect: Warm welcome, the smell of cakes, personal help and a cool goodie bag. Oh and seriously good cupcakes.
Level: Beginners/Intermediates (who can’t do the swirl!)
Type of Class: Decoration
Price: £50 or £45 if you book two places at once
Go with: Mum or sister

Remember to check out the Primrose Bakery website for the latest classes. (Keep in mind that classes and prices may change etc)

Finally I want to thank Laura and Becky for really making my Sunday and my Mother’s day really special for my mum as well. Thanks girls!


Bake On!
Penny (hope you like the new siggie!)
Bake On! Penny x
Related Posts Plugin for WordPress, Blogger...