Friday, 25 July 2014

Summer Raspberry Roulade

Hello and Happy Friday! Or should I say Happy Fat Friday! I love Fat Friday's its sort of like TGIF, but about gorging yourself on food purely because its Friday. Or is that just me? Maybe its just be who goes "Yeah! Its Friday! Stuff my face with food!". Anyway, its recipe time.  
Nothing says summer like a roulade, and what works better with sweet sticky meringue and smooth cream? Tart summery raspberries, of course. I had this recipe written up and ready to publish but had a serious lack of pictures. There wasn't even a picture of the end product... So it sat in the drafts for about, oh I don't know, 2 years?


I remember making this for the first time in my pastry class, this was when the blog first started my gosh! Its a good dessert to use up any leftover egg whites and cream. Lots of different fruit can also be used, try a tropical version with pineapple chunks or try mixing a little cocoa powder in the whipped cream for a taste of chocolate.  

Recipe: Meringue (My own recipe)
4 egg whites
275g caster sugar
Lots of Whipped Cream (I whip about 500ml double or whipping cream.)
200g Raspberries
Equipment:
Bowl
Electric mixer with the whisk attachment/Handheld whisk
Baking sheet lined with baking paper
Large palette knife
Clean teat-towel
 
1. Preheat the oven to 220c/200f/Gas Mark 7. Line the baking sheet with baking paper and set aside. 
 2. Whisk eggs whites to a soft peak. This should be white, foamy but still holding a peak.
3. Put your mixer on a low/medium speed and add the sugar gradually one tablespoon at a time every 10-15 seconds. This gives the time for the sugar to dissolve.
4 Once all the sugar has been incorporated, whisk for a further 2-3 minutes at a lower speed. The meringue should be stiff.
5. Spread onto a baking sheet using a palette knife and bake for 8 minutes until a pale golden colour. The reduce the heat to 160c/140f/Gas Mark 3 and bake for a further 15 minutes. 
6.Remove from the oven, the meringue should be firm to touch, not wet or soggy. Place on clean teatowl and remove from the baking paper. Set aside to cool
7.Meanwhile, whip the cream until it stands in stiff peaks. 
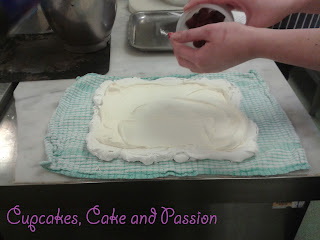
8. Once the meringue is cool, spread the cream over the meringue. Sprinkle some raspberries liberally.
9. The next part is a little tricky. Roll the meringue with the tea-towel to support the roll. This will keep you're fingers clean and will prevent it breaking.
 
What type of fruit would you put in your roulade? Want to share your Fat Friday foodie moment? Use the hashtag #fatfridays on Instagram and twitter or whatever the cool kids are using nowadays.
Have a good weekend and Happy Baking!
 
Bake On! Penny x

Thursday, 17 July 2014

Home-made Raspberry Pink Lemonade

In the last two days its been really hot and humid here in the UK. I was going to do some baking but I found it so stifling and after a day's work, heat can make you so lazy. Instead of cooking, I made lemonade, for the first ever time! I've never thought to make it before! It was a good opportunity and why not? 
Also, I've been super busy planning my graduation ball (party time! woo!) and my actual graduation. I'm so excited and I can't believe its finally happening!! About damn time! I'll be posting pictures on instagram and will maybe do a vain follow-up post for it :D . In the meantime, put your feet-up, relax and sip this easy to make summer drink. 


Recipe:
Makes 4 glasses  (Recipe Adapted from Peggy Porschen Boutique Baking 
·      100ml fresh lemon juice
·      100g caster sugar
·      500ml spring water or filter water
·      60g fresh raspberries  
·      Ice cubes
·      Lemon or lime slices

 Equipment:
·       4 glasses plus pretty straws
·       Juicer
·       Saucepan
·       Sieve
·       Spoon
·       Jug
·       Saucepan
·       Bowl

1. Place the lemon juice, sugar and water into a saucepan and bring to the boil. 
2.Simmer until all the sugar has dissolved and set aside to cool.
3. While the lemon liquid is cooling, place the raspberries into a sieve, with a bowl underneath, and pass through using a spoon. You should have a fresh raspberry juice. 
4.Add the raspberry juice to the cooled lemon liquid, mix and serve in glasses with ice and lime. Drink.  


iI'm just so in love with the colour of this. Its bright and vibrant. Perfect summer cooler drink. 
I hope you all have a great weekend in the sun! I'll see you after I graduate WOOO!!!

Bake On! Penny x

Thursday, 10 July 2014

Banana and Salted Caramel Soy Smoothie

I found out recently that fruit smoothies are meant to be bad for you. I mean, just when you find an easy way to get 1 of your 5 a day or is it 1 of your 7 a day now? When you blend fruit together in a smoothie, all the sugars in the fruit go directly into your blood stream and gives you a sugar rush... and then a sugar crush. Its always better to eat the whole fruit, unblended.  In the meantime this smoothie will have to do, its not good for you but its very tasty and good for a chocolaty fix. I used Hotel Chocolate's Salted Caramel and Pecan Spread because its so tasty blends really nicely into a smoothie.

Recipe: Makes 4 little smoothies to drink or 2 for very greedy people
·       400ml Soy Milk
        2 teaspoons matcha green tea powder (I use teapigs Matcha)
·       4 teaspoons of dissolvable fibre power (I used Benefibre)
        5 tablespoons Hotel Chocolat Salted Caramel and Pecan Spread/(or peanut butter).
        2 Bananas, chopped and frozen 
       (if using peanut butter blend 2 tablespoons of cocoa power to add some chocolatey goodness) 

Equipment:
·       Blender
        Freezer
·       Teaspoon
·       Tablespoon
·       Chopping Board
        Knife
        Baking Sheet lined with baking paper/silicone paper
        Glasses

1. Cut up the banana and place on a lined baking sheet and place into the freezer and leave for 3 hours or until frozen.
2.Put all the ingredients into a blender and whizz until fully combined and thick.
3. Pour into glasses and slurp.

Have you ever used up some bits in the fridge to make a smoothie or shake?
Bake On! Penny x

Friday, 4 July 2014

Easy Peanut-Butter and Jelly Brownies

Happy 4th July to all my American readers! I hope your having a fab day and to celebrate this occasion we've got an all time U.S.A favourite: peanut butter and jelly. I hope these brownies do this combo justice. Lets get started.
Peanut Butter and Jelly, that's jam to us British, is a fail-safe sandwich filling that has been made popular by the USA (thanks for that). Who knew it could work! When I first heard of the term PB and J I thought it was a type of pyjama. But times have moved on, I think for the better. 
These brownies take about 15-20 minutes to make as they are quite easy to make. What takes the biggest amount is the baking, which is 50 minutes. The reason for this is to slow bake the brownies to gooey perfection.

Recipe: Peanut Butter and Jelly (Jam) Brownie (Adapted from The Little Book of Lunch
·      350g dark chocolate (I used leftover chocolate for this so use good quality chocolate)
·      200g unsalted butter, softened (plus a little extra for greasing the tin)
·      450g golden caster sugar
·      4 eggs
·      100g plain flour, sifted 
·      5 tbsp Smooth Peanut Butter
·      5 tbsp Strawberry Jam
·      1 small pack of salted peanuts 

 Equipment:
·       23cm square cake tin, greased and line with greaseproof paper
·       Electric mixer/hand-held electric whisk
·       Sieve
·       Heatproof Bowl
·       Saucepan
·       Bowl
·       Knife
·       Tablespoon
·       Teaspoon

1.    Pre heat the oven to 170c/325c/ Gas mark 3. Grease and line the tin.
2. In a heatproof bowl placed over a small amount of boiling water in a saucepan, to melt the chocolate and butter. Set aside to cool a little. 
3. In a bowl beat the eggs and sugar until shiny. Gently mix in the melted chocolate and butter mixture and fold in the sifted flour.
4. Roughly mix in 2 tablespoons of the peanut butter into the brownie batter.  
5. Pour the brownie mix into the lined tin. 
6.Drop the last 3 tablespoons of peanut butter into the brownie mix and swirl though roughly.
7. Drop the 5 tablespoons of jam into the mix and roughly swirl. This will create a marbled effect throughout and will taste fab!
8. Bake for 45-50 minutes until shiny and crispy on top. To make sure the brownies are cooked, stick a sharp knife in. If it comes out clean-ish then it’s ready (I'm sure you know that already right? You've read that enough times on the many blogs you've read before to know when a cake is done? Well... good for you!)Leave to cool in the tin.
9. Cut into small squares and moonch until you are full of peanut butter goodness.

I hope you all have a great weekend. How are you celebrating 4th of July? 


Bake On! Penny x
Related Posts Plugin for WordPress, Blogger...