Wednesday 29 May 2013

Pastry Class: Fruit Bavarois, Vanilla Pannacotta, Lemon Steamed Sponge Pudding and Easy Apple Crumble.

In this week's pastry class, we were continuing to look at hot and cold desserts. It was a mixed bag of recipes, all of which can easily be done with the intention of impressing your family and dinner guests. 

A bavarois is a type of mousse made with double or whipping cream. It can be made with chocolate, fruit or even vegetables. I wasn't surprised to see that Heston Blumental of the Fat Duck restaurant has already made a wacky version of a bavarois. If your new to a bavarois, stick to fruit such as strawberries or raspberries. I had to do this for a pastry assessment along with creme caramel, which was surprisingly easy, why not give it a go?

Fruit bavarois made by me with raspberry puree
Recipe: Fruit Bavarois
Ingredients:
·       125g fruit puree (I used raspberry)
·       125g stock syrup (recipe here just omit the cinnamon)
·       250g whipping cream
·       3 gelatine leaves
·       10g lemon juice

Equipment:
·       Whisk
·       Bowlx2
·       Saucepan
·       Spatula
·       1 bowl of ice
·       4 round cook rings lined with clear acetate
·       1 tray lined with silicone paper
·       1 disposable piping bag
Step 1. Line the tray 
1.    Line a tray with silicone paper and then line 4 small cook rings with clear plastic acetate. 
Steap 2. Soak the gelatine
2.    Soak the gelatine in a small with cold water. Make sure that it is cold water as if the water is warm the gelatine will dissolve and become useless.
3.    Whip the whipping cream until it just standing up, holding its peak.
4.    Mix together the syrup and fruit puree in a saucepan and heat gently on a low heat.
5.    Once the fruit and syrup has heated through, take off the heat and add the gelatine leaves. To do this, take the gelatine out of the water, (they should be squeezy and a little slimy) and squeezing until all of the water has been rung out.
6.    Stir the mixture until the gelatine has dissolved, this should take about a minute. At this point you can add the lemon juice according to taste. If you’d like a really sweet mousse then omit the lemon juice.
Step 7. Cool it down as quickly as possible
7.    To cool the mixture down as quickly as possible, have a bowl of ice ready. Put the fruit mixture into another bowl and place that into the bucket of ice and whisk lightly to cool down. Scrap the sides down once and a while so that the mix doesn’t set on the side of the bowl.
Step 8. fold in the cream
8. Once the mixture is cold enough then fold in the semi whipped cream in thirds.
Step 9. Pipe into the cook rings
9. Once all the cream has been incorporated, place the mixture into a piping bag and pipe into the cook rings.
10. Place in the fridge for about an 1 hour and 30 mins or until set.
Step 11. Remove from mould
11. To remove, place a palette knife under the bavarois and place on desired plate. Take the cook ring off and carefully peel the acetate off.
A finished bavarois made by my pastry tutor faye

My finished bavarois made by erm me!

12. Keep the decoration simple, pipe a little whipped cream and garnish with raspberry and mint, and maybe a little icing sugar if your feeling fancy!
Vanilla panna cotta to the right of this picture. 
Panna-cotta is an Italian cooked cream dessert that can be flavoured with chocolate, fruit or caramel. As long as you get the jiggly wiggly cream right its a sure-fire winner!

Vanilla Panna-Cotta
Ingredients:
·       125ml milk
·       375ml double cream
·       ½ vanilla pod
·       1 aniseed
·       2 gelatine leaves/ 2 agar agar leaves if you're a vegetarian 
·       50g caster sugar

Equipment:
·       Whisk
·       Bowlx2
·       Saucepan
·       Spatula
·       4 dario molds/ or the small Christmas pudding moulds/ ramakins
·       Measuring jug
·       Sieve

1.    Soak the gelatine in a small with cold water. Make sure that it is cold water as if the water is warm the gelatine will dissolve and become useless.

2.    Add the cream, milk, the vanilla pod and the aniseed into a saucepan and heat gently until boiling slightly.
3.    Once the mixture is hot enough add the sugar and gelatine.
4.    Take the mixture off the heat and stir until the sugar and the gelatine has dissolved.
5.    Sieve the mixture into a measuring jug. This removes the star anise.
6.    Let the panna-cotta mixture cool for a few moments before pouring into the Dario molds and placing into the fridge for about 1 hour or until set.
7.    The best way to get the pannacotta out of the mold onto a plate, is to have a bowl of warm water ready. Place the mold into the water for about 6 seconds, get your desired plate on top of the mold then flip the plate, so that is on a table. Wiggle the mold a little until it is evenly on the plate.
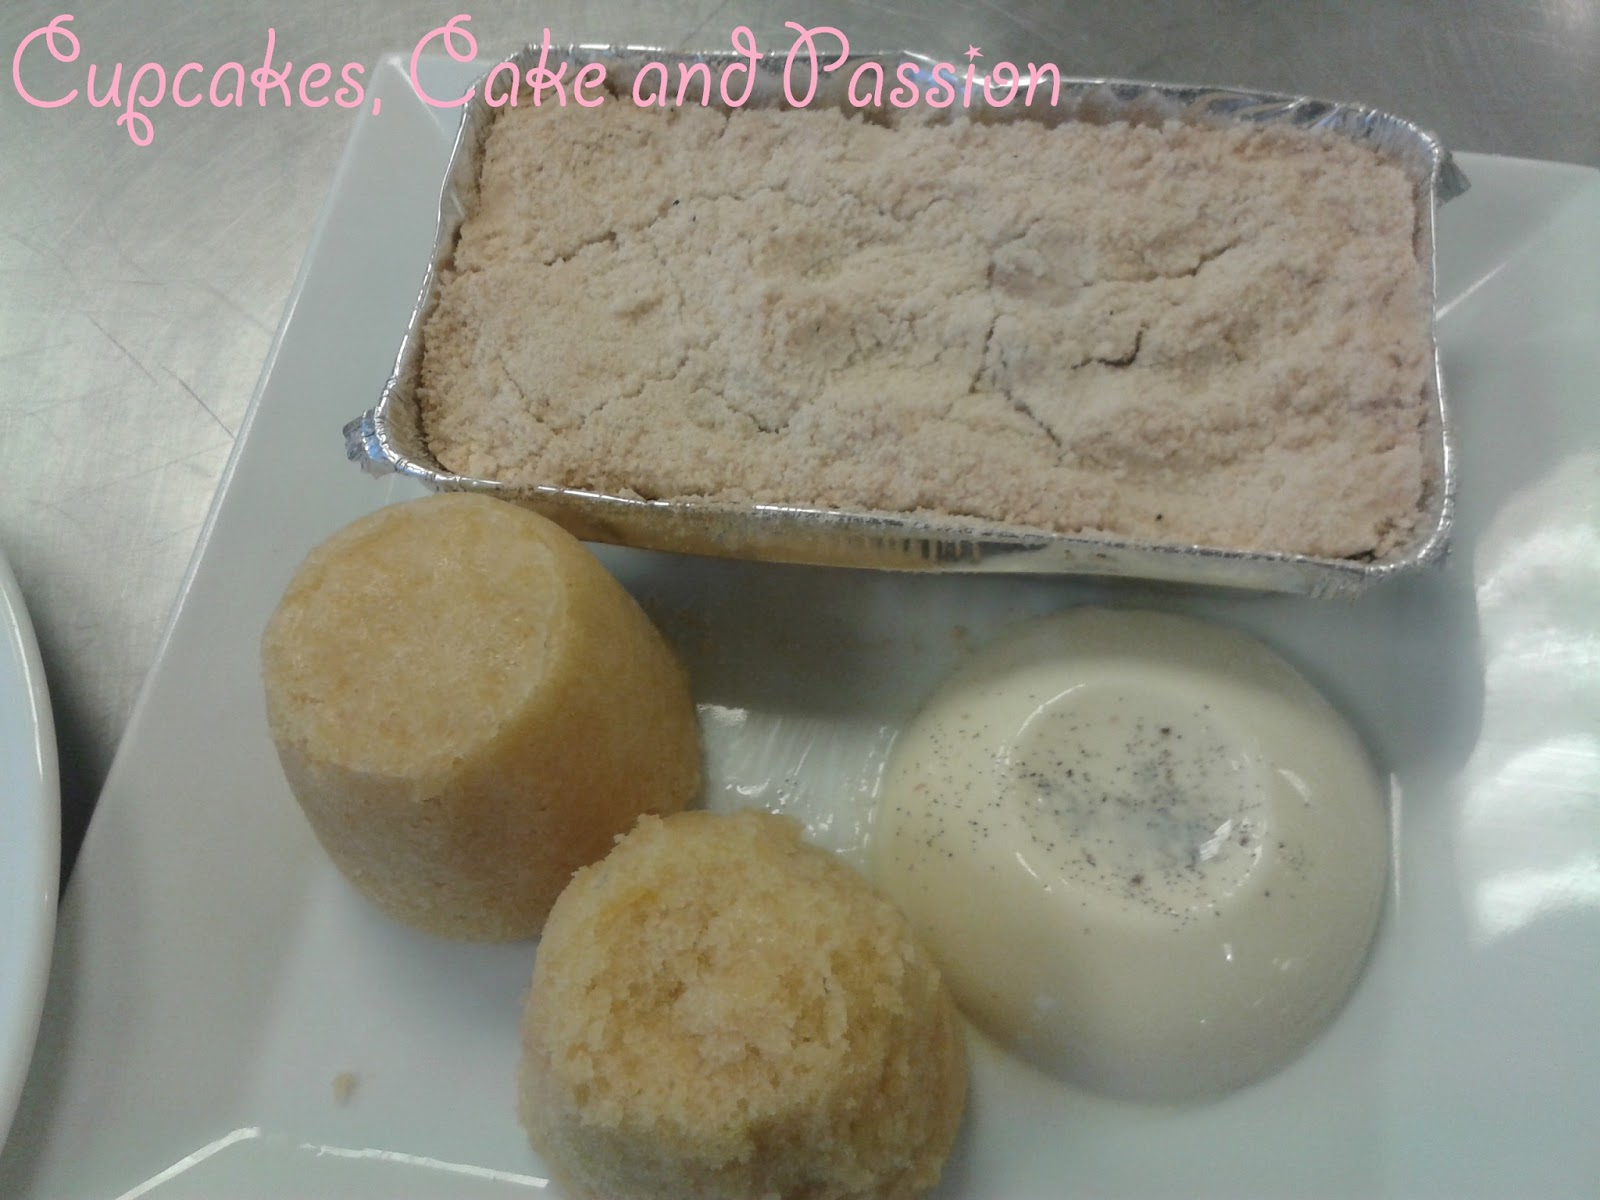
Steamed sponge pudding to the left

There is little to explain about this. It's lemon flavoured sponge slowly steam cooked, perfect with custard or ice cream.
Lemon Steamed Sponge Pudding
Ingredients:
·       270g plain flour, sieved
·       15g baking powder, sieved
·       250g caster sugar
·       250g margarine, room temperature
·       5 eggs
·       The juice and zest of 2 lemons

Equipment:
·       Wooden spoon
·       Grater
·       Bowlx2
·       Electric hand held whisk/Spatula
·       Sieve
·       Small Dario moulds or small metal moulds well greased with margarine and flour

1.    Preheat the oven to Gas ¼/ 225f/ 110c
2.    Sieve the flour and baking powder into a separate bowl and put aside.
3.    Cream the sugar and margarine together using a spatula/hand held electric whisk.
4.    Add the eggs one at a time, beating after each addition.
5.    Fold in the flour and baking powder gently until fully incorporated.
6.    Add the lemon zest and juice and fold in again.
7.    Spoon into the very well buttered and floured moulds.
8.    Bake for 30-45minutes at Gas ¼/ 225f/ 110c. This is a steamed pudding, so the oven needs to be at a lower temperature. You will know when the puddings are ready when you can put a knife into the cake and it comes out clean.
Apple crumble top of the picture.

An apple crumble is, as far as I'm aware, is a British dessert which is served in Autumn when apples are at there best.  This makes a great family dessert and is insanely easy to make!

Apple crumble
Ingredients:
·       300g plain flour, sieved
·       150g caster sugar, sieved
·       100g unsalted butter, room temperature
·       1 can tinned apples or 450g peeled, cored apples and cut into 1cm cubes
·       1 pinch of cinnamon  
·       Cream or custard to serve

Equipment:
·       Sieve
·       Bowl x 2
·       Oven proof dish
·       Colander

1.    Pre-heat the oven to 180c/350f/Gas Mark 4
2.    Drain all the syrup from the apples using a colander Or peel, core and dice the apples. Put the fresh apples in a bowl of water with a little lemon juice to stop them from going brown.
3.    Sieve the flour and sugar into a bowl with the butter, rub together until it resembles fine breadcrumbs.
4.    Place the apples into the oven proof dish and then a pinch of cinnamon on top of the apples.
5.    Sprinkle the crumble mix on top. Don’t be tempted to pack it down, this will solidify the crumble into a biscuit.
6.    Bake the crumble for 40-45 minutes, or until the top is brown.
7.    Serve with custard or thick cream

I hope you've enjoyed this weeks pastry class!
Bake on!

Bake On! Penny x

Thursday 23 May 2013

The 2 Week Matcha Diary Has Been Completed


This is my final post regarding my Matcha Diary. This was the final day. So here's my final review on my two weeks. So what was it all about? Check out the original post here

The last two weeks have been fun. I've passed my last two pastry assessments (recipe here). EVER! I've had no coffees for 2 weeks, which is hard for a coffee lover but I'm also a tea lover which is good as I replaced my morning coffee with Matcha Green Tea.  


According to the teapigs website they had a study on people to try the teapig matcha shot for 2 weeks (see the website for there results).
I've taken the questions set at the end of the two week process and asked myself and have answered as followed:

Hey Penny!
Hello Penny, You ok?

Can't complain. Had an upset tummy the other day.
Ditto. Freaky.

Whatever, you're talking to yourself you insane person. Lets just do this, I've got cupcakes to ice! So, will you recommend Matcha to a friend?
Nice thanks. I would recommend to a friend who was interested in tea and looking for that healthy alternative to coffee for an energy boost. 
Would you buy Matcha again?
Right, I would buy Matcha again because it can be put into hot water, milkshakes, porridge and baked with. I feel that, because it's versatility that I would buy again. So in short yes!

Do you feel that you had more energy?
Definitely Yes! I feel that I was more buzzing as the day continued especially on work days, when the boost was really needed. I would have the Matcha shot and just over an hour after taking the shot I would feel more awake and focused on the task I was doing. 

How much energy?
How do you measure energy? Well I would say that I feel more energised for about 4 hours. 

Did it make you slimmer?
Hey! Thats rude! If I have to be honest, I'm not really looking to lose weight at this stage so I haven't noticed.

How about your skin and nails, has it improved?
I have noticed that my nails are stronger and are less prone to flaking. I've also noticed that my skin is much better, (less blemishes) considering that I have oily skin and any improvement no matter how little is very much appreciated.  

So in conclusion, was it worth it? 
You know what? Yes, I think its worth trying out even if you try a sample or pinch a loved ones Matcha tea, if you can grab it before they notice!


Bake On and Drink On!

Bake On! Penny x

Monday 20 May 2013

Matcha Diary Day 12 and 13


Day 12:
11am-Sunday lay-in!
11:30am- Had my Matcha shot for the day.
12am- Had some lunch.

1:30pm- Went shopping
4:30pm- Got home and had a mini cupcake rather then a regular one. But no snacks at all. 
10pm- Thrown myself into bed. Busy day tomorrow.

Day 13:

6:30am-Boo for mondays! But have to get to work. Busy day. I did have my Matcha Shot right at the start of my morning. However, my stomach is feeling achey so decided to have a glass of water to flush out my system.
7:15am- Sadly my stomach ache didn't pass and I wasn't able to go to work. 

10am- My stomach hasn't settled but I feel wide awake thanks to the matcha. Feeling calm. 
12pm-Still haven't had anything to eat but feeling much better
1:20pm- Have had a little soup and still feeling focused and calm.
2pm- Feeling really tired and drained, this feeling continued through the day.  
9:30pm- Going to bed not feeling so good again.


Bake On! Penny x

Saturday 18 May 2013

Matcha Diary Day's 9, 10 and 11

I fell behind in my matcha day for the last couple of days down to pure tiredness. To be honest no amount of matcha could have woken me up. But it did it's job for work as it did keep me focused.

Day 9:
6:10am-Really tired after the excitement of passing my pastry assessment. But got to do my job and get to work.
7am- Had my Matcha shot for the day.
8am- Got to work in the end after falling asleep on the commute.

10am- Feeling a bit tired still but still very tired.
12:30pm- Had lunch and it's made me more sleepy!
2pm- Feeling a little better but still having an undertone of tiredness.
4:30pm- Home time! Time to eat, bath and then bed!
10pm- Thrown myself into bed!

Day 10:

6:30am-Got up but it's too early to think. I think it's time for a Matcha shot! But it's FRIDAY!!! YAY!
7:30am- Out the door to work and feeling much better and more ready to work.
8:30am-Had breakfast at work. I feel more calmer and relaxed for the insanely busy day ahead.
9:30am- Feeling very alert and calm but the whole office is stressed out as it's 'busy Friday' 

12:40am- Had a brief lunch as it was really busy. The Matcha must be doing it's job as I feel calm despite the stressy customers. Staying  very 
5pm- After a hectic day and a busy week, I'm looking forward to a saturday doing nothing.   

11pm-I know it's a friday but I'm off to bed. I think the matcha really helped me get through the day. Sleepy time for me.

Day 11
10:10am- Woke up and went instantly for the matcha. Its become a a good habit. I was meant to meet my university tutor but she couldn't make it. Which is great for a lay in!
11am- Had a  
1:30pm- Feeling a little drained but not sure why. 
4pm-want to Starbucks with my mum and neighbour and her grandchildren. I really fancy a coffee >.< but I resisted and had some tea instead.
6pm- Feeling great and energised. Thanks again matcha!

Bake On! Penny x

Pastry Class: Creme Caramel, Tiramisu and Lemon Syllabub/Posset


Sometimes a recipe can have an air of arrogance about them.
They sound too hard or too posh to make. Which is why I have added another baking rule- Never be discouraged!

In this pastry class, I'm going to be focusing on classic cold desserts, that have stood the test of time and can be used to impress at a dinner party.  

Creme Caramel will always be an old school dessert which, frankly never thought would never grace my plate. I think its the jiggy-wiggly of it or maybe the overdose of cream but it's not my favourite dessert but I'm happy to give anything a go. It wasn't as bad as I thought but I'd much prefer a cupcake.
However, I think there are still people in the world who have a soft spot for this dessert.
Essentially, this recipe is similar to a French creme brulee which is egg custard with a burnt sugar top. The difference is that the egg custard is turned out onto a plate with a layer of caramel on top. But see for yourself, do you think this traditional dessert deserves to be in spot light? Or has it had it's day? You be the judge! (I had to make Creme carmel for my pastry assessment. Read about it in my Matcha Diary Day 7 ) 

Creme Caramel
Recipe: Crème Caramel (Recipe inspired by my pastry tutor Faye)
Ingredients: Caramel
·       100g sugar
·       125ml water

Ingredients: Cream
·       ½ litre of double cream
·       4 eggs
·       50g sugar
·       3 drops of vanilla

Equipment
·       Saucepan x2
·       Measuring jug x 2
·       Dario moulds/Christmas pudding moulds x 4
·       Whisk
·       Bowl
·       Roasting tin filled with half-filled with warm water

1.    Get your Dario moulds near where you are making the caramel. This makes life a lot more easier.
Step 2. Boil the water and sugar together
Step 2. It will turn a golden brown to brown colour
2.    Place ¾ of the water into a saucepan with sugar on a medium heat. Don’t be tempted to stir. Let the liquid bubble from a clear colour until it turns to a golden brown colour. At this point add the remaining water. The sauce will sizzle and make a lot of noise. Reboil the liquid.
Step 3. Move as quickly as possible. 
Step 3. Leave to set.
3.    As quickly as you can, pour the caramel into the moulds. Once all the moulds have a good layer of caramel in set aside to set. (A little tip, once you’ve finished with the saucepan, put some warm water into it so it doesn't stick to the saucepan)
4.    Place the double cream into another saucepan, on a medium heat.
5.    While the cream is heating, whisk the eggs, sugar and vanilla into a bowl until combined.
6.    Once the cream is just heated, pour the cream slowly into the egg mixture whilst whisking until the mixture is completely combined.
7.    Make sure that your caramel is set before pouring the cream into the moulds.
8.    Place moulds into the roasting tray filled with warm water and cook in the oven at 160c/325f/ Gas Mark 3 for 40 minutes.
9.    When cool remove from moulds by loosen with fingers and turn out on plate.  

Tiramisu translates as "Make me happy", which I think is appropriate for something which has coffee and booze in it. There are many variations on this Italian dessert but the main ingredients are cream, coffee, eggs and savoiardi biscuits or Lady fingers.
Classic tiramisu to the left of the picture 
Ingredients: Tiramisu (Recipe inspired by my pastry tutor Faye)
·       125g mascarpone cheese
·       250g whipping cream, plus a little extra to garnish
·       50g/ 2 egg yolks (or pasteurised egg if you can get it)
·       1 tsp vanilla extract
·       60g caster sugar
·       1 tsp Ameretto liquor/ marsala wine
·       A packet of Savoiardi Biscuits
·       2 tsp instant coffee
·       Chocolate, chopped as finely as you can (I used milk chocolate but dark is just as good.)
·       Cocoa powder, to garnish

Equipment:
·       Small bowl
·       Serving glass/(aka Coupe in the business-thanks Faye!)
·       Whisk
·       Bowl
·       Chopping board
·       Knife
·       Palette knife
·       Sieve

1.    Mix the coffee and liquor with a little water. Dip the biscuits into the liquid. Just enough to make a thick biscuit base into a serving glass.
2.    In a large bowl whisk all of the other ingredients, apart from the chopped chocolate, until the whole thing is holding its shape.
3.    Spoon a layer of the creamy mixture into the glass on top of the biscuit layer.
4.    Sprinkle a thick layer of chopped chocolate into the creamy mixture.
5.    Spoon a little whipped cream on top of the chocolate layer and even out using a palette knife.
6.    Chill in the fridge until set.
7.    Dust a little cocoa powder on top to garnish.

Syllabub (pronouned Silla-bub) is cream and sugar based English dessert which has routes in the Tudor period. It can often be called a posset It's often made with fruit such as raspberry and in this case, lemon. 

Lemon syllabub to the right of the picture

Recipe: Lemom Syllabub/Posset (Recipe inspired by my pastry tutor Faye)
Ingredients:
·       550ml double cream
·       225g caster sugar
·       The juice and zest of 2 lemons
Equipment:
·       Saucepan
·       Grater
·       Measuring jug
·       Wooden spoon
·       Serving glasses/(aka Coupe in the business)

Step 1.  Boil the ingredients
1.    Boil the double cream, sugar, juice and zest together in a saucepan on a low heat.
Step 2. Stir occasionally.
2.    Stir occasionally until reduced by about 1/3.
3.    Once reduced, let the cream cool down a little.
4.    Spoon a little into a serving glass.
5.    Chill in the fridge until set.

Have an excellent weekend.
Bake On!

Bake On! Penny x
Related Posts Plugin for WordPress, Blogger...