Wednesday 28 November 2012

Cheese and Tomato Quiche

With Christmas coming just around the corner, many people are getting their baking sheets ready for Yuletide baking and forgetting the savoury treats for those that don't have a sweet tooth. 

Recently I was 'told off' for not making savoury dishes. So, luckily in my pastry class we ended up making short pastry which can be used in both sweet and savoury tarts.

This recipe is super easy and is so tasty. The custard filling can be made with onions, peppers, or whatever vegetable you like! Also if you like a little heat, try some cajun seasoning or chopping up a little chilli and mixing it into the custard (but don't go nuts with the chilli!). 
Cheese and Tomato Quiche

Recipe: Short Pastry
  •        200g Soft Flour (plus extra for greasing tray)
  •        50g Marg/Butter (plus extra for greasing tray)
  •        50g Lard
  •        50 ml water
  •        Pinch of salt

Equipment:
  •        Sieve
  •        Wooden Spoon
  •        Bowl
  •        Measuring Jug
  •        7 inch ring
  •        Baking sheet
  •        Rolling pin
  •        Pastry brush
  •        Ruler
  •        Knife
  • Baking beans
  • Silicone paper


1.    Rub the fat into the flour until it resembles fine breadcrumbs
2.    Make a well and pour in water.
3.    Mix ingredients to a smooth paste.
4.    Rest in fridge for 10-15 minutes.
5.    Warm the dough a little by rolling out the dough to 3-4 mm thick.
6.    Butter and flour the ring and tray. Don't use the silicone paper at this stage. Got that? NO PAPER!
7.    With finger push around the edges of the ring. Use a piece of dough to push it in even further.
8.    Trim the dough so that there is a little edge around the tart and let it rest in fridge for 10 minutes. You dont want to trim the tart so you have a neat edge yet. This type of pastry has a reputation of shrinking whilst cooking.  
9.    After resting put in oven at 160c/ 325f/ Gas Mark 3 for 15 mins with silicone paper and baking beans in. If the pastry is still soft it's underdone, so take the paper and beans out and let it cook for a further 5 mins in oven. It shouls be pale but dry. The dryer the better.
10. Trim the tart of any excess pastry, so that it has a nice neat edge. Do this as soon as the tart comes out of the oven because its easier to cut and cut with a serrated knife as it makes the job tons easier. 
11. Make the custard filling (see below) and fill the tart until it's almost full. Cook for 15 mins or until the top is slightly golden. When the tart comes out of the oven it should wobble a little but not liquidy or super stiff. It will set as it comes to room temperature. Thats it! Enjoy hot or cold. :D

Recipe: Savoury Custard
  •        225g Milk
  •        11/2 Eggs
  •        100g Cheese
  •        Half of a tomato
  •        Pinch of salt
  •        Pinch of pepper
  •        Pinch of paprika
Equipment:
  •        Measuring Jug
  •        Fork
  •        Grater
  • Knife
  • Chopping board

1.    Whisk the egg and milk together.
2.    Add the seasonings and mix again.
3.Chop the vegetables and grate the cheese
4.    Put the cheese and tomato into the short paste case
5.    Pour on the milk mix when near the oven to avoid spillage.

Bake On!
Penny 

Bake On! Penny x

Monday 19 November 2012

Tutorial: Princess Mini Cakes

As the title suggest this is a tutorial. My first ever tutorial. (Yay!)
Where did the idea come from? I'm going to Euro Disney and love all things Disney, otherwise what's the point of going to Disneyland? Anyways, I wanted to do something that celebrated my love of Disney take took form of a cupcake without going over the top. 
As the idea of a cupcake is to keep it simple and elegant. So this tutorial is really simple and is a good excuse to sing well known Disney songs around the kitchen and maybe wear a crown as well.

This tutorial will make 4 pretty Princess Cakes depending on how much buttercream you want to use. I did mine thick so I only make the 4 Princess Cakes.
You will need:
Basic Butterscotch Cupcakes- Make 12 little cakes
  • 100g plain flour
  • 1 teaspoon of baking powder
  • 1/4 teaspoon of salt
  • 125g unsalted butter
  • 50g caster sugar
  • 2 eggs
  • 75 ml whole milk
  • 1/4 teaspoon of butterscotch essence

For the Butterscotch Buttercream
  • 400g icing sugar
  • 200g unsalted butter
  • 1/4 teaspoon of butterscotch essence


Equipment You Will Need:
  • Cupcake Tin
  • Hand whisk
  • Jug
  • Cupcake Cases

Method
  1. Pre-heat the oven to 180c/350f/Gas Mark 4. 
  2. Place flour, baking powder, sugar, salt and butter together in a bowl.  
  3. Mix together with your fingertips until the mixture resembles fine breadcrumbs.  
  4. In another bowl whisk eggs, milk and essence together until well blended. 
  5. Slowly pour the egg mixture into the dry ingredients, whisking all the time.  
  6. Whisk gently until smooth, being careful not to over-mix. Pour the cake batter into jug to make it easy to handle. 
  7. Place 12 paper cupcakes cases into the cupcake tin. 
  8. Carefully pour all the cake batter into the cases, filling each one only half way.  
  9. Bake for 20-25 mins until springy to touch. 
  10. Leave for a few minutes, the transfer the cupcakes to a wire rack to cool completely.  
  11. To make the frosting, combine the icing sugar, butterscotch extract and butter in a bowl. 
  12. Beat with an electric whisk for around 5 mins until light and fluffy.  
  13. Check the cakes have completely cooled or they will melt the frosting.


So while your cake's are cooling you need to make your toppers:
Equipment You Will Need:
  • Princess Toppers (I got these from Kreations Parties )
  • Lolly-sticks/sucker-sticks/toothpicks
  • Scissors
  • Tape
Method:
  1. Cut out your princesses carefully. Remember when using scissors be very careful.
  2. Place your sticks in the middle of the cut out at the back. 
  3. Tape the stick in the middle and make sure that its secure. 
Cut out your princesses carefully. Remember when using scissors be very careful.
Place your sticks in the middle of the cut out at the back.
Once you've got your princess cake toppers ready and your cupcakes are cool need to start building your cake 'dresses'. Essentially, its 2 cupcakes to one dress just like the picture below. To secure the two cakes together, level the cakes carefully with a knife and spread a layer of buttercream between them.
To secure the two cakes together, level the cakes carefully and spread a layer of buttercream between them. 
To Decorate the Cakes You Will Need:
  • Buttercream used with the recipe above
  • Food Paste Colours in princess colours (See left)
  • Glitter
  • Piping bag with a star nozzle
  • A small palette knife.


Method: 
  1. Once the cakes have been 'glued' together with the buttercream. Separate the buttercream according to which colour's you want. 
  2. Cover your cakes in a layer of buttercream and put in the fridge to create a crumb layer. Do this for every cake.
  3. Once the cakes have chilled in the fridge for an hour, smooth on the buttercream and decorate to your liking!
Cover your cakes in a layer of buttercream and put in the fridge to create a crumb layer
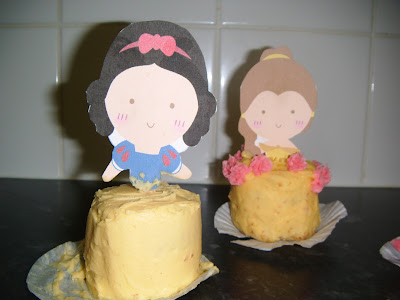
I used plain simple colours with a little glitter and piped on a couple of details. I wanted it to remain simple but here are the results:
Snow White and Belle Princess Cupcakes
Aurora (Sleeping Beauty) and Ariel (The Little Mermaid) Princess Cupcakes

I'm quite proud of my little princesses! Aren't they so sweet? If you try this tutorial, post pictures on the blog, email me pictures, post them on the facebook page or on twitter.
I hope that your enjoyed the tutorial and had fun reading!

Bake On!
Penny
Bake On! Penny x

Sunday 11 November 2012

Banana Honey Cake- with thanks to Louise

I've got to thank my friend Louise for inspiring this recipe, if it wasn't for her, I would have never even considered making a banana cake.
Thanks so very much Louise I loved making it :D  
This recipe also uses up stuff that's hanging around in the cupboard. 

For the cake you will need:


  • 100g butter
  • 6 tbsp honey
  • 300g self-raising flour
  • 1tsp baking powder
  • 1tsp cinnamon
  • 150g sugar
  • 2 ripe banana's 
  • 250ml milk and 2 eggs, beaten
Equipment needed:
  • 450g loaf tin
  • small saucepan
  • tablespoon
  • sieve
  • 2 large bowls
  • fork
  • wooden spoon
  • metal spoon
  • skewer/knife
  1. Preheat oven to Gas Mark 4/180c/350f, and grease and line your loaf tin.
  2. Melt butter with the honey in a small saucepan.
  3. Melt butter with the honey in a small saucepan.
  4. Sift the flour, baking powder and cinnamon into a large bowl, add the sugar and stir.
    Mash the bananas, mix them with the milk and eggs, and then add the melted butter and honey.
  5. Sift the flour, baking powder and cinnamon into a large bowl, add the sugar and stir.
  6. Mash the bananas, mix them with the milk and eggs, and then add the melted butter and honey.
  7. Pour the banana mixture into the dry ingredients, and fold it in with a metal spoon.
  8. Pour the mixture into the loaf tin and bake for 45 minutes, or until a skewer inserted into cake comes out clean.
Pour the mixture into the loaf tin and bake for 45 minutes, or until a skewer inserted into cake comes out clean.
Orange Cream Cheese Icing. 
This seriously is the most yummy icing and it really goes well with the banana cake. 

  • 175g cream cheese
  • 450g icing sugar
  • 125g unsalted butter
  • the zest of one orange
Equipment needed:
  • Sift
  • 2 bowls
  • Hand mixer
  • Knife
  1. Sift the icing sugar in one of the bowls
  2. Mix all the other ingredients together in the other bowl.
  3. Once combined, mix the icing sugar a little at a time. 
  4. Spread the icing onto the cooled banana cake. 
If you don't have the time to make the Orange Cream Cheese Frosting, then just decorate with warmed honey.
Bake On!
Penny 
Bake On! Penny x

Wednesday 7 November 2012

Sexy Choux Pastry

There's something decadent, irresistible and just a little sexy about choux pastry. Its versatile and comes in different forms. In this post we'll be looking at  Eclairs, Choux Buns, Beignets and paris brest.
Beignets(bottom left), Paris Brest (top left), eclairs (bottom right) and choux buns (top right)
Choux (prenounced shoe) means cabbage in French, this may be because of its resemblance to the vegetable. This pastry is made with water, flour, egg and butter; it is first cooked on the stove to let the water evaporate from the pastry, the moisture is then replaced by the eggs. 
·   
        250ml of water
·       Pinch of sugar
·       Pinch of salt
·       100g Butter, margarine or oil
·       Strong Flour sieved 125g
·       4 eggs

Equipment:
·       Sieve
·       Wooden Spoon
·       Saucepan
·       Bowl

1.    Bring the water, sugar, salt and fat to the boil in a saucepan. Remove from heat.
2.    Add the sieved flour and mix in with a wooden spoon.
3.    Return to a moderate heat and stir continually until the mixture leaves the sides of the pan.
4.    Remove from the heat and allow to cool.
5.    Gradually add the beaten eggs beating well. Don’t add the eggs in all at once- check the consistency as you go. The mixture may not take all the egg. It should just flow back when moved in one direction.
Choux Buns (top) and Eclairs (bottom)

The first Ã©clair recipe translated into English appeared around 1884 and was thought that it was invented by Antonio Careem, a famous french chef. It is an oblong hollow pastry traditionally filled with cream. 

The history of the choux bun (profiterole) is unknown but is essentially a small round pastry which filled with cream. In the US its called a Cream Puff 

Recipe: Chocolate Eclairs/Choux Buns
·       125ml Choux pastry
·       ¼ litre Whipped Cream
·       25g Chocolate

Equipment:
·       Sieve
·       Wooden Spoon
·       Saucepan
·       Bowl
1.    Place the choux paste into a piping bag with a 1cm plain tube.
2.    Pipe into 8cm straight line onto a lightly greased, damped baking sheet. (To make choux buns just pipe a small circle instead of a straight line.)
3.    Bake 180c/350f/Gas Mark 4 for 20 mins.
4.    Allow to cool. Slit down one side with a sharp knife.
5.    Fill with sweetened, vanilla-flavoured whipped cream, using a piping bag and small tube.
6.    Decorate with chocolate sauce. (To make a nice professional line, put a spoon into the melted chocolate and tilt the eclair to one side and let the chocolate side along the pastry and back into the bowl.) 

Recipe: Chocolate Sauce
·       125g water
·       40g sugar
·       30g chopped chocolate
·       8g dark cocoa powder
·       4g cornflour
Equipment:
·       Wooden Spoon
·       Saucepan
·       Bowl
·       Whisk
·       Conical strainer
1.    Bring to the boil 100g of water and sugar
2.    Mix to a paste the cocoa, cornflour and 25g water
3.    Add to the boiling water and sugar and whisk until mix returns to the boil and thickens
4.    Remove from heat. Add chopped chocolate and pass through a conical strainer.

A Paris Brest is a dessert that was invented in 1891 to commemorate the Paris-Brest-Paris bicycle race, traditionally filled with praline cream. However I used whipped cream instead. It is made in the same method as the choux buns, but is piped into a circle like a bicycle wheel and bake at 180c/350F/Gas Mark 4 for 15 mins.
A Paris Brest filled with Whipped cream
Beignets translate as 'bump' in French and is similar to the English fritter. Beignets are well known in the US, especially in New Orleans as a desert served with icing sugar. I made mine with cinnamon and sugar. 
Fry and left over choux pastry in little clumps until golden at 160c in a deep fat fryer and roll them in cinnamon and caster sugar. Easy!
Beignets (best eaten hot!)


Bake On!
Penny 
Bake On! Penny x

Monday 5 November 2012

Halloween and Dios De Los Muertos Cooking featuring Orange Juice, Chocolate and Ginger

Sorry for the lateness of the post, I know that Halloween has long gone now and everyone is now planning for Christmas (Its only November but its good to be organised). I thought that I'd still put my Halloween cupcake recipes anyway. 
This post is dedicated to my better half and his lovely housemates, who munched all of the cupcakes leaving me with 12 empty cupcake wrappers. I went to Portsmouth for the weekend that why the post was so late. 
Guys, you're the funniest and hopefully, next time I'll win at Monopoly! And not go bankrupt! 
These recipes can also be made during Autumn for those cosy nights in as there not specific to Halloween apart from the decorations. 


Orange Juice Cupcakes
These cupcakes are a little different from the traditional buttercream instead having a decorators glaze which is sweet and tangy. (The decorations that I have used I got from Sugar Robot on Etsy)
Orange Juice decorated with an orange juice glaze and edible bats. 
Recipe: Makes 16 cupcakes
·       125g unsalted butter, at room temperature
·       2 teaspoons of baking powder
·       1 teaspoon of salt
·       2 large eggs
·       300g plain flour, sifted
·       200g sugar
·       Juice and finely grated rind of 1 orange
·       1 tablespoon lemon juice

1.    Pre-heat the oven to 160c fan/180c/350f/Gas Mark 4 and line 2 mini muffin trays with cupcake cases. Mix flour, baking powder and salt and set aside.
2.    In a large mixing bowl cream the butter and sugar until pale and smooth, which should 3-5 minutes using an electric hand mixer.Add eggs on at a time mixing well.
3.    Combine orange juice and lemon juice and add enough water to make 2/3 cup. Alternately add the flour mixture and liquid. Add the orange rind and beat batter until smooth. Add food colouring if using.  
4.    Carefully spoon the mixture into the cupcake cases, filling them to about two-thirds full. Bake in the oven for about 25 minutes until slightly raised and golden brown. To check they are cooked, insert a skewer in the centre of one of the cakes-it should come out clean.

Decorators Glaze
·       200g sugar
·       ¼ cup cornflour
·       240ml orange juice
·       1 teaspoon lemon juice
·       Pinch of salt
·       30g unsalted butter
Recipe:
1.    Combine sugar and cornflour in a pan over a low heat. Gradually add orange and lemon juices and stir until well blended. Add salt and butter. Cook over a low heat, stirring constantly until the mixture is thick and glossy. Remove from heat and cool. Add food colouring, if desired. Glaze the cooled cupcakes.


Ginger Cupcakes with Ginger Frosting
This recipe is taken from the Primrose Bakery Cupcake Book and works so well on cold winter evenings. 

Recipe: Makes 18
200g unsalted butter, at room temperature
175g dark soft brown sugar
    3 tablespoons black treacle
4 pieces of stem ginger, drained and chopped (reserve the syrup for the ginger icing)
    2 large eggs
300g self raising flour, sifted
150ml semi-skimmed milk at room temperature
1 tablespoon ground ginger
Pinch of salt
1.    Pre-heat the oven to 160c fan/180c/350f/Gas Mark 4 and line 2 cupcake trays with cupcake cases.
2.    Melt the butter, sugar and treacle in a saucepan over a low heat. Cool briefly and then stir in the milk.
3.    Add the chopped ginger to the beaten eggs then beat into the butter mixture. Sift the flour, ground ginger and salt and add to the warm mixture. Combine thoroughly.
4.    Carefully spoon the mixture into the cupcake cases, filling them to about two-thirds full. Bake in the oven for about 30-35 minutes until slightly raised and golden brown. To check they are cooked, insert a skewer in the centre of one of the cakes-it should come out clean.
5.    Remove from the oven and leave the cakes in their tins for about 10 minutes before carefully placing on a wire rack to cool. Once they are completely cool, you can ice the cupcakes.

Buttercream
·       140g unsalted butter, at room temperate
·       4 tablespoons freshly ginger syrup, drained from a jar of steam ginger
·       2 teaspoons freshly squeezed lemon juice
·       300g icing sugar, sifted
Recipe:
1.    In a large mixing bowl beat the butter for a few minutes until really smooth, the add the remaining ingredients and beat again until the icing is smooth and creamy. 

Last but certainly not least, my personal favourite. For Dios de los Muertos, or Day of the Dead, I made chocolate cinnamon cupcakes. 

In Mexico, on the 1st November, families gather to remember and pray for deceased loved ones. Traditions include making private altar decorated with Sugar Skulls. (The decorations that I have used I got from Sugar Robot on Etsy)

Picture from: Indian Country Today Media Network

Dios de los Muertos Cupcakes
Dios de los Muertos Cinnamon and Chocolate Cupcakes decorated with Sugar Skulls

Recipe: Makes 16 cupcakes
·       125g unsalted butter, at room temperature
·       2 teaspoons of baking powder
·       1 teaspoon of salt, plus a little for the egg whites
·       1 teaspoons cinnamon
·       4 eggs separated
·       175g chocolate
·       120ml milk
·       265g plain flour, sifted
·       150g soft brown sugar
·       1 teaspoon of vanilla extract


1.    Pre-heat the oven to 160c fan/180c/350f/Gas Mark 4 and line 2 mini muffin trays with cupcake cases. Mix dry ingredients together and set aside.
2.    Melt chocolate and milk together in a bowl over a pan of simmering water or in the microwave. As soon as the chocolate is melted, remove from heat, stir to blend, set aside and cool
3.    Cream butter and soft butter sugar until light and fluffy. Add egg yolks one at a time, mixing well after each addition. Add flour addition in three parts, blending well until flour disappears.
4.    Beat egg whites with a pinch of salt until they are stiff but not dry. Gently fold whites into batter.
5.    Carefully spoon the mixture into the cupcake cases, filling them to about two-thirds full. Bake in the oven for about 20-25 minutes until slightly raised and golden brown. To check they are cooked, insert a skewer in the centre of one of the cakes-it should come out clean.
Buttercream
·       300g icing sugar
·       1 tablespoon milk
·       125g unsalted butter
·       1 teaspoon vanilla extract
·       1 teaspoon cinnamon
Recipe:
1.    Cream butter and sugar until light and fluffy. Add milk, vanilla and cinnamon and continue beating until frosting is of a good spreading consistency. 
i

I hope you all had a good Halloween! 
Bake On!
Penny 
Bake On! Penny x
Related Posts Plugin for WordPress, Blogger...