Showing posts with label pretty. Show all posts

Friday, 7 December 2012

Christmas Yule Log Cake

The Yule Log is an iconic cake which is often made at Christmas?
But why? Where on earth did someone get the idea to go: "Hey I'm going to make a chocolate cake shaped like a log!"
My homemade chocolate Yule log decorated with chocolate boiled buttercream and  marzipan holly leaves .

The origins of the Yule log began with the Celts. They believed that for 12 days at the end of December the sun stood still. If they could keep yule logs burning bright for those 12 days, then the sun would be persuaded to move again, to make the days grow longer.
The Victorians carried on this tradition but instead of letting the log burn for 12 days they let it burn for 12 hours. (Information taken from The Truth About Christmas by Philip Ardagh)
Of course, this tradition has been adapted into the chocolate swiss roll cake that we are familiar with today. Which works out loads better since its more fun to eat rather then burn.  
Yule log cakes are more fun to eat rather then burn.

Recipe: Sponge
  • 115g/ 3 Eggs
  • 70g water
  • 100g plain flour
  • 6g baking powder
  • 150g caster sugar
  • 2 g salt
  • 25g flour
  • 25g cocoa powder
Equipment:
  • Sieve
  • Wooden Spoon
  •  Bowl
  • Mixer
  • Baking sheet lined with silicone paper
  •    Kitchen towel
  •    Mixer
  •    Measuring jug
1.  Sieve the 100g of flour, baking powder, caster sugar, and salt together.
2.  Add the eggs into the dry ingredients and mix on a slow speed until the mixture comes together. Then mix on a high speed for 4 minutes. If the mixture looks a little firm, add the water. When you add the water mix for a further 1 minute.
3.  Sieve the cocoa into the cake mixture and fold in.
4.    Bake at 210c/425f/ Gas Mark 7 for 10-15 minutes.
5.    As soon as the cake comes out of the oven, slide it out of baking sheet and take off the paper carefully or the sponge will split!
6.    Lay the tea towel on a dry flat surface and place the sponge on top. Roll the tea towel and the sponge together so you have a Yule log shape. This is best done warm as it is easy to roll when warm. Leave the roll until the cake is cold. 
7.    Once the buttercream has been made then unroll the log and fill with the buttercream but not so much that it leaks from the edges. Roll the log back to its original log shape.
8.  Next decorate the outside with the buttercream using a palette knife. To make Yule log more, erm log-like then lightly scrape a fork along the sides of the log. Finish with icing sugar and marzipan holly leaves.  

Recipe: Yule Log Icing
  •        375g/ about 6 egg whites
  •        250g Caster Sugar for egg whites
  •        375g caster sugar
  •        250g butter diced
  •        300g icing sugar
  •        250g Chocolate (I used milk chocolate)

Equipment:
  •        Sieve
  •        Mixer
  •        Saucepan
  •        Bowl
  •        Palette knife
  •        Fork
  •        Sugar thermometer
     1.Weight out the 375g sugar with water, until it looks like wet sand, in a saucepan over a high heat. Stir once at this stage.
     2. Put egg whites and sugar into a mixer and mix until the egg whites are forming stiff peaks.
     3. Boil the sugar and water until it reaches 118c.  This should be easy if you have a sugar thermometer. (If not just use ice cold water by dipping fingers into pan and very quickly dipping them back into the cold ice water. You should be able to form a soft ball. I didn't have a sugar thermometer and it worked out just fine, although be careful as there is a burn risk here! )
    4. Turn off the heat and when the sugar is 121c then pour this into egg whites. Keep the mixer on whilst you pour the sugar water mixture in. This will cook the egg whites and add extra sweetness.
    5. Start adding the diced butter, one cube at a time.
6. Once all the butter has been added, add in the melted chocolate.

This makes a nice Christmas centrepiece or even as a gift to a chocolate lover. 
A lovely homemade gift for a special someone. 

Bake On and Merry Christmas!
Penny  Follow on Bloglovin
Bake On! Penny x

Monday, 19 November 2012

Tutorial: Princess Mini Cakes

As the title suggest this is a tutorial. My first ever tutorial. (Yay!)
Where did the idea come from? I'm going to Euro Disney and love all things Disney, otherwise what's the point of going to Disneyland? Anyways, I wanted to do something that celebrated my love of Disney take took form of a cupcake without going over the top. 
As the idea of a cupcake is to keep it simple and elegant. So this tutorial is really simple and is a good excuse to sing well known Disney songs around the kitchen and maybe wear a crown as well.

This tutorial will make 4 pretty Princess Cakes depending on how much buttercream you want to use. I did mine thick so I only make the 4 Princess Cakes.
You will need:
Basic Butterscotch Cupcakes- Make 12 little cakes
  • 100g plain flour
  • 1 teaspoon of baking powder
  • 1/4 teaspoon of salt
  • 125g unsalted butter
  • 50g caster sugar
  • 2 eggs
  • 75 ml whole milk
  • 1/4 teaspoon of butterscotch essence

For the Butterscotch Buttercream
  • 400g icing sugar
  • 200g unsalted butter
  • 1/4 teaspoon of butterscotch essence


Equipment You Will Need:
  • Cupcake Tin
  • Hand whisk
  • Jug
  • Cupcake Cases

Method
  1. Pre-heat the oven to 180c/350f/Gas Mark 4. 
  2. Place flour, baking powder, sugar, salt and butter together in a bowl.  
  3. Mix together with your fingertips until the mixture resembles fine breadcrumbs.  
  4. In another bowl whisk eggs, milk and essence together until well blended. 
  5. Slowly pour the egg mixture into the dry ingredients, whisking all the time.  
  6. Whisk gently until smooth, being careful not to over-mix. Pour the cake batter into jug to make it easy to handle. 
  7. Place 12 paper cupcakes cases into the cupcake tin. 
  8. Carefully pour all the cake batter into the cases, filling each one only half way.  
  9. Bake for 20-25 mins until springy to touch. 
  10. Leave for a few minutes, the transfer the cupcakes to a wire rack to cool completely.  
  11. To make the frosting, combine the icing sugar, butterscotch extract and butter in a bowl. 
  12. Beat with an electric whisk for around 5 mins until light and fluffy.  
  13. Check the cakes have completely cooled or they will melt the frosting.


So while your cake's are cooling you need to make your toppers:
Equipment You Will Need:
  • Princess Toppers (I got these from Kreations Parties )
  • Lolly-sticks/sucker-sticks/toothpicks
  • Scissors
  • Tape
Method:
  1. Cut out your princesses carefully. Remember when using scissors be very careful.
  2. Place your sticks in the middle of the cut out at the back. 
  3. Tape the stick in the middle and make sure that its secure. 
Cut out your princesses carefully. Remember when using scissors be very careful.
Place your sticks in the middle of the cut out at the back.
Once you've got your princess cake toppers ready and your cupcakes are cool need to start building your cake 'dresses'. Essentially, its 2 cupcakes to one dress just like the picture below. To secure the two cakes together, level the cakes carefully with a knife and spread a layer of buttercream between them.
To secure the two cakes together, level the cakes carefully and spread a layer of buttercream between them. 
To Decorate the Cakes You Will Need:
  • Buttercream used with the recipe above
  • Food Paste Colours in princess colours (See left)
  • Glitter
  • Piping bag with a star nozzle
  • A small palette knife.


Method: 
  1. Once the cakes have been 'glued' together with the buttercream. Separate the buttercream according to which colour's you want. 
  2. Cover your cakes in a layer of buttercream and put in the fridge to create a crumb layer. Do this for every cake.
  3. Once the cakes have chilled in the fridge for an hour, smooth on the buttercream and decorate to your liking!
Cover your cakes in a layer of buttercream and put in the fridge to create a crumb layer
I used plain simple colours with a little glitter and piped on a couple of details. I wanted it to remain simple but here are the results:
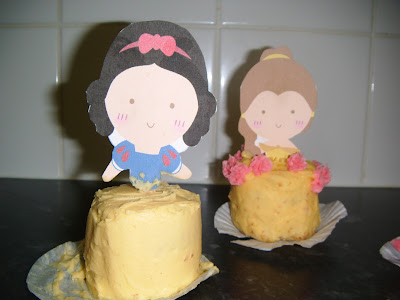
Snow White and Belle Princess Cupcakes
Aurora (Sleeping Beauty) and Ariel (The Little Mermaid) Princess Cupcakes

I'm quite proud of my little princesses! Aren't they so sweet? If you try this tutorial, post pictures on the blog, email me pictures, post them on the facebook page or on twitter.
I hope that your enjoyed the tutorial and had fun reading!

Bake On!
Penny
Bake On! Penny x
Related Posts Plugin for WordPress, Blogger...